How to Install & Configure TURN Server (coTURN)
Install coTURN Server
Audio / Video based services requires a wide range of UDP ports to be available for WebRTC. In some network restricted sites, such as those behind NAT or a firewall that restricts outgoing UDP connections, users may be unable to make outgoing UDP connections to your media server.
TURN protocol is designed to allow UDP communication flows to bypass NAT or firewalls by forcing the client to connect to the TURN server, and then force TURN server to connect to the destination on their behalf.
Using a TURN server under your control improves the success of connections to your multimedia application and also improves user privacy, since it acts like a proxy so that peers will no longer be sending their IP address information to a public STUN server.
Required Hardware
TURN protocol is not really CPU or memory intensive. Additionally, since it’s only used during connection setup (for STUN) and as a fallback for users who would otherwise be unable to connect, the bandwidth requirements aren’t particularly high. For a moderate number of connections, a single small VPS configuration is usually enough. Here you can find my reccomendations to install coTURN:
At least two vCPUs
4GB Memory.
20GB HDD. SSD can be used, but not mandatory.
The most important thing is the networking performance.
Low jitter (less than 30ms)
Low latency (less than 150ms)
Enough bandwidth to handle relayed media streams in both directions.
Having the server behind NAT (like on Amazon EC2) is OK, but all incoming UDP and TCP connections on any port (TCP 80 & 443, UDP 3478, 10000-20000) must be forwarded to coTURN server and not firewalled.
Required Software
I recommend using a minimal server installation of Debian with netinst or Ubuntu. Since coTURN software uses port TCP 443, the server which coTURN will be installed cannot have any other web applications running.
coTURN is already available in the Debian and Ubuntu repositories and it can be installed with apt-get:
sudo apt-get update
sudo apt-get install coturn
Please note that coTURN will not start automatically until the configuration is finished. You can find the configuration tasks in below.
DNS Entry For coTURN
You can use certbot to generate free TLS certificates from Let’s Encrypt. To setup certbot, enter the following commands on your coTURN server:
sudo add-apt-repository ppa:certbot/certbot
sudo apt-get update
sudo apt-get install certbotNote: If you face with add-apt-repository command not found error, please use sudo apt-get install software-properties-common command to install the necessary packets.
sudo apt-get install software-properties-commonYou can then run a certbot command like the following to generate the certificate, replacing turn.you-domain.com with the domain name of your TURN server:
sudo certbot certonly --standalone --preferred-challenges http \
    --deploy-hook "systemctl restart coturn" \
    -d turn.you-domain.com
Current versions of the certbot command set up automatic renewal by default. Note that when certbot renews the certificate, it will restart coTURN service, so coTURN will start to use the updated certificate files. This will cause an interruption on any ongoing TURN connections. You may change the certbot renewal schedule or disable automatic renewal if you like.
Configure coTURN
coTURN configuration is stored in /etc/turnserver.conf file. There are a lot of options and all of them are documented in comments in that file. I include a sample configuration below with comments as the recommended settings, also with notes in places where customization is needed.
You can replace the contents /etc/turnserver.conf with the file below and make these changes:
nano /etc/turnserver.conf- Replace turn.you-domain.com with the hostname of your TURN server
- Change the values in bold with your choices.You can see an example config file below:
You can see an example config file below:
server-name=turn.you-domain.com
realm=turn.you-domain.com
cert=/etc/letsencrypt/live/turn.you-domain.com/cert.pem
pkey=/etc/letsencrypt/live/turn.you-domain.com/privkey.pem
fingerprint
listening-ip=0.0.0.0
external-ip= 1.2.3.4/192.168.0.1 #or just write the external ip
listening-port=3478
min-port=10000
max-port=20000
log-file=/var/log/turnserver.log
verbose
lt-cred-mech
user=myusername:mypassword
You MUST change the below settings according to your setup.
server-name=turn.you-domain.com
realm=turn.you-domain.com
cert=/etc/letsencrypt/live/turn.you-domain.com/cert.pem
pkey=/etc/letsencrypt/live/turn.you-domain.com/privkey.pem
external-ip= 1.2.3.4/192.168.0.1 #or just write the external ip
user=myusername:mypassword
You can now start the COTURN service with this command:
systemctl start coturnRunning coTURN as a Service
The Debian / Ubuntu package for coTURN requires that you edit a file to enable at startup. Edit /etc/default/coturn file
nano /etc/default/coturnand uncomment the following line:
TURNSERVER_ENABLED=1That’s it! coTURN install is complete. Now you have an up and runnning TURN server!
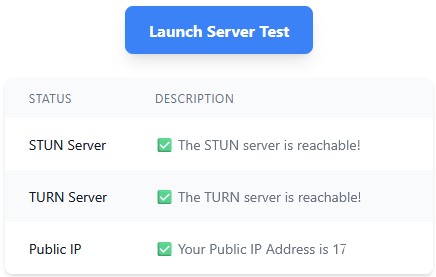
Testing Your TURN Server
To test your coTURN server, you can use Turn Server Testing Tool. Go to metered.ca webpage and enter following:
STUN or TURN URI : turn:Your Public IP Address:3478
TURN username: myusername
TURN password: mypassword
Then click Add Server button and then click Launch Server Test button. If everything works well, you should see Done as final result.
Ins0mniA
No comments to display
No comments to display