Tutorials
This book is cover mostly tutorial, guides, FAQs for operating systems and software general.
- Linux Desktop Environment
- Linux useful commands
- How to Install and configure Fail2ban
- Unattended Upgrades Debian - Ubuntu
- How to Install Fail2ban on Debian 12
- Watchtower
- How to enable or disable public key authentication in SSH
- How to Identify and Fix Bad Sectors on Your Hard Drive
- Migrate from Zoraxy to Caddy
- Πώς να δημιουργήσετε σωστά ένα URL για κριτικές Google.
Linux Desktop Environment
Linux Desktop can easily be installed:
Cinnamon Core
sudo apt install -y cinnamon cinnamon-coreFull Cinnamon Desktop
sudo apt install -y cinnamon-desktop-environmentXFCE
sudo apt install -y xfce4LXDE-gtk3
sudo add-apt-repository ppa:kelebek333/lxde-gtk3
sudo apt update && sudo apt install lxde-gtk3
Mate Desktop
sudo apt install ubuntu-mate-desktopZorin OS Lite XFCE
sudo apt install -y zorin-os-lite-desktopor
sudo apt install --reinstall zorin-os-lite-desktopZorin OS Core version
sudo apt install -y zorin-os-desktopor
sudo apt install --reinstall zorin-os-desktopIf you find this helpful or not please leave a comment.
Ins0mniA
Linux useful commands
Find for text inside all files
Do the following:
grep -rnw '/path/to/somewhere/' -e 'pattern'-r or -R is recursive,
-n is line number, and
-w stands for match the whole word.
-l (lower-case L) can be added to just give the file name of matching files.
-e is the pattern used during the search
Along with these, --exclude, --include, --exclude-dir flags could be used for efficient searching:
This will only search through those files which have .c or .h extensions:
grep --include=\*.{c,h} -rnw '/path/to/somewhere/' -e "pattern"This will exclude searching all the files ending with .o extension:
grep --exclude=\*.o -rnw '/path/to/somewhere/' -e "pattern"For directories it's possible to exclude one or more directories using the --exclude-dir parameter. For example, this will exclude the dirs dir1/, dir2/ and all of them matching *.dst/:
grep --exclude-dir={dir1,dir2,*.dst} -rnw '/path/to/search/' -e "pattern"This works very well for me, to achieve almost the same purpose like yours.
Ins0mniA
How to Install and configure Fail2ban
What is Fail2ban
Fail2ban is an open-source intrusion prevention software that helps protect Linux servers from malicious attacks by monitoring log files for suspicious activity and implementing various countermeasures. It works by analyzing log entries generated by system services and applications, such as SSH, Apache, Nginx, or any other service with configurable logs.
The primary purpose of Fail2ban is to detect and block repeated failed login attempts, brute-force attacks, or any other suspicious activity that could indicate a potential security breach. It achieves this by dynamically modifying firewall rules to block the IP addresses associated with the detected malicious behavior.
To install and configure Fail2ban, you can follow these general steps
1. Update your system
Ensure your system is up to date by running the following commands:
sudo apt update
sudo apt upgrade
or
apt update && apt upgrade -y && apt autoremove -y && apt autoclean2. Install Fail2ban
Use the package manager of your distribution to install Fail2ban.
For Ubuntu or Debian-based systems, run:
sudo apt install fail2banor
apt install -y fail2ban3. Configure Fail2ban
The main configuration file for Fail2ban is typically located at /etc/fail2ban/jail.conf. However, it's recommended to create an override configuration file to make future updates easier. Run the following command to create the override file:
sudo cp /etc/fail2ban/jail.conf /etc/fail2ban/jail.localor
cp /etc/fail2ban/jail.conf /etc/fail2ban/jail.local4. Edit the configuration file
Open the jail.local file in a text editor:
sudo nano /etc/fail2ban/jail.localor
nano /etc/fail2ban/jail.localIn this file, you'll find various configuration options. Some important options to consider are:
Locate the [DEFAULT] section, which contains the following global options:
- ignoreip: This option enables you to specify IP addresses or hostnames that fail2ban will ignore. For example, you could add your home or office IP address so fail2ban does not prevent you from accessing your own server. To specify multiple addresses, separate them with a space. For example:
ignoreip = 127.0.0.1/8 93.184.216.34 - bantime: This option defines in seconds how long an IP address or host is banned. The default is 600 seconds (10 minutes).
- maxretry: This option defines the number of failures a host is allowed before it is banned.
- findtime: This option is used together with the maxretry option. If a host exceeds the maxretry setting within the time period specified by the findtime option, it is banned for the length of time specified by the bantime option.
- destemail: The email address where notifications will be sent.
- action: The action to be taken when a rule is triggered (e.g., banning the IP, sending an email).
Some important options to consider are:
- enabled: Set to true to enable the jail.
- port: The service's port you want to protect.
- filter: The name of the filter to use (usually corresponds to the service, e.g., sshd for SSH).
- logpath: The log file Fail2ban should monitor.
Adjust these options based on your needs. You can also enable/disable specific jail sections depending on which services you want to protect.
In this file, you can define custom jails (rules) and configure their behavior. Here's an example of a basic configuration for SSH protection:
[DEFAULT]

# "ignoreip" can be an IP address, a CIDR mask or a DNS host. Fail2ban will not
# ban a host which matches an address in this list. Several addresses can be
# defined using space separator.
ignoreip = 127.0.0.1/8 123.45.67.89
# The bantime parameter sets the length of time that a client will be banned
# when they have failed to authenticate correctly. This is measured in seconds.
# By default, this is set to 30 days.
bantime = 30d
# The next two parameters are findtime and maxretry. These work together to
# establish the conditions under which a client is found to be an illegitimate
# user that should be banned.
# The maxretry variable sets the number of tries a client has to authenticate
# within a window of time defined by findtime, before being banned. With the
# default settings, the fail2ban service will ban a client that unsuccessfully
# attempts to log in 5 times within a 1 day window. Time units 1s 1m 1h 1d 1w
findtime = 1d
backend = auto
usedns = warn

[sshd]
enabled = true
port = ssh
filter = sshd
logpath = /var/log/auth.log
maxretry = 5
You can add more jails for other services you want to protect, such as Apache, Nginx, or any other application running on your server.
5. Create Custom Filters (if necessary)
Filters define patterns Fail2ban looks for in log files. Default filters are located in /etc/fail2ban/filter.d/. If you need to create custom filters, you can do so by creating .conf files in this directory.
6. Enable and start Fail2ban
Once the configuration is complete, enable and start the Fail2ban service:
sudo systemctl enable fail2ban
sudo systemctl start fail2ban
or
systemctl enable fail2ban
systemctl start fail2ban
Fail2ban should now be running and actively monitoring log files for suspicious activity.
7. Check Fail2ban status
To check the status of Fail2ban and view any banned IP addresses, use the following command:
sudo fail2ban-client statusor
fail2ban-client statusThis will display information about the active jails and any banned IPs.
To view detailed information about a specific jail:
sudo fail2ban-client status <jail-name>or
fail2ban-client status <jail-name>8. Testing Fail2ban
You can test Fail2ban by intentionally triggering a ban, like repeatedly failing to log in to your SSH server. After reaching the maxretry limit, your IP address should be banned.
That's it! You have installed and configured Fail2ban on your system. It will now monitor log files and take actions against suspicious activity based on your defined rules. Make sure to review the Fail2ban documentation for advanced configuration options and additional customization.
Ins0mniA
Unattended Upgrades Debian - Ubuntu
The purpose
The purpose of unattended-upgrades is to keep the computer current with the latest security (and other) updates automatically.
If you plan to use it, you should have some means to monitor your systems, such as installing the apt-listchanges package and configuring it to send you emails about updates. And there is always /var/log/dpkg.log, or the files in /var/log/unattended-upgrades/.
As of Debian 9 (Stretch) both the unattended-upgrades and apt-listchanges packages are installed by default and upgrades are enabled with the GNOME desktop. Rudimentary configuration is accessible via the "Software & Updates" application (software-properties-gtk).
In Debian 12 (Bookworm) unattended-upgrades is no longer a default install with Gnome. Download and upgrade schedules are set up by Packagekit using systemd timers on installation. The default behaviour in Gnome for upgrades detected via APT is now to advise of availability, and not to install by default.
Install method
To install these packages, run the following command as root:
apt-get install -y unattended-upgrades apt-listchangesIns0mniA
How to Install Fail2ban on Debian 12
Fail2Ban is an essential security tool for Linux systems, designed to protect your server from brute-force attacks and other types of malicious activities. It works by monitoring log files for repeated failed login attempts or other suspicious behavior and automatically bans the offending IP addresses by updating firewall rules. Fail2Ban is highly configurable, allowing you to define custom filters, ban times, and actions based on the specific needs of your server.
On Debian 12 or 11, Fail2Ban can be easily installed and configured to enhance your system’s security. Once installed, you’ll have access to a wide range of configuration options to tailor Fail2Ban to your requirements. Additionally, understanding how to view logs and manually ban or unban specific IP addresses will give you greater control over your server’s protection. This guide will walk you through the installation process and provide tips to help you get started with configuring Fail2Ban, managing logs, and controlling IP bans on your Debian system.
Contents
- Update Debian Before Fail2ban Installation
- Install Fail2ban via APT Command
- Confirm Fail2ban Installation
- Verify Fail2ban Service Status
- Install UFW (Optional)
- Create a Backup of Fail2ban Settings
- Configure Fail2Ban Settings
- Ban and Unban via Fail2Ban Commands
- Check and Monitor Fail2Ban Logs
- Troubleshoot
Update Debian Before Fail2ban Installation
Before installing Fail2Ban, it’s essential to update your Debian operating system. This ensures that all existing packages are up-to-date and that you are using the most recent versions of your software. To update your system, run the following command in your terminal:
sudo apt update && sudo apt upgrade -y && sudo apt autoremove -y && sudo apt autocleanor if your are already connect as root then copy paste the below code
apt update && apt upgrade -y && apt autoremove -y && apt autocleanThe sudo apt update command fetches the latest package information from the repositories, while sudo apt upgrade upgrades the installed packages to their newest versions.
Install Fail2ban
Install Fail2ban via APT Command
Fail2Ban comes included in Debian’s default repository, meaning you don’t need to add additional repositories to install the software. To install Fail2Ban, use the following command in your terminal:
sudo apt install fail2ban -yor if your are already connect as root then copy paste the below code
apt install fail2ban -yThis command instructs the package manager (apt) to install the Fail2Ban package on your Debian system.
Confirm Fail2ban Installation
After the installation, confirming that Fail2Ban has been installed correctly is essential. To do this, run the following command:
fail2ban --versionThis command will display the installed Fail2Ban version, which indicates a successful installation.
If the command is not running the try enable Fail2Ban service and start Fail2Ban service.
if it is continue NOT to start and EXIT with error then for the troubleshooting to fix it, and continue the steps from here.
Verify Fail2ban Service Status
After the installation, Fail2Ban should be active and enabled by default. However, it’s always a good idea to verify the service’s status to ensure it is running as expected.
To check the Fail2Ban service status, use the following systemctl command:
systemctl status fail2banIf your Fail2Ban service is not activated or running, you can start it using the following command:
sudo systemctl start fail2banor if your are already connect as root then copy paste the below code
systemctl start fail2banThis command instructs systemctl to start the Fail2Ban service. If you also want to enable Fail2Ban on system boot by default, use the following command:
sudo systemctl enable fail2banor if your are already connect as root then copy paste the below code
systemctl enable fail2banEnabling Fail2Ban on system boot ensures that the service will automatically start when your Debian server is rebooted, providing continuous protection without manual intervention.
Install UFW (OPTIONAL)
Install UFW
To install UFW on your Debian system, run the following command in your terminal:
sudo apt install ufw -yor if your are already connect as root then copy paste the below code
apt install ufw -yThis command uses the package manager (apt) to install the UFW package from the Debian repository.
Verify UFW Installation
After installing UFW, verifying that the installation was successful is essential. To check the installed UFW version, run the following command:
ufw versionThis command will display the installed UFW version, indicating a successful installation.
Enable UFW
sudo ufw enableor if your are already connect as root then copy paste the below code
ufw enableThe command prompts UFW to start and configure to run on system startup. After running this command, you should see an output similar to the following:
Firewall is active and enabled on system startup
This output confirms that UFW is active and will start automatically when your Debian server is rebooted.
Troubleshoot
Upon a fresh installation sometimes Fail2ban is fail to start, below is a few step to fix it.
cd /etc/fail2ban
sudo cp jail.conf jail.local
or if your are already connect as root then copy paste the below code
cd /etc/fail2ban
cp jail.conf jail.local
Then run this command:
sudo echo -e "[sshd]\nbackend=systemd\nenabled=true" | sudo tee /etc/fail2ban/jail.localor if your are already connect as root then copy paste the below code
echo -e "[sshd]\nbackend=systemd\nenabled=true" | tee /etc/fail2ban/jail.localOutput:
[sshd]backend=systemdenabled=true
And I restarted it:
sudo systemctl restart fail2banor if your are already connect as root then copy paste the below code
systemctl restart fail2banThat's it your Done.
Ins0mniA
Watchtower
Configure Watchtower
Watchtower has various configuration options. You can customize its behavior by passing environment variables or command-line arguments.
Here’s an example of running Watchtower with a few additional options:
# Stop and remove old container
docker stop watchtower && docker rm watchtower

# Run new fork (auto-detects API)
docker run -d \
  --name watchtower \
  --restart unless-stopped \
  -v /var/run/docker.sock:/var/run/docker.sock \
  nickfedor/watchtower
WATCHTOWER_CLEANUP=true instructs Watchtower to remove old images after updating.
WATCHTOWER_POLL_INTERVAL=300 sets the interval for checking updates to every 5 minutes (300 seconds).
Run Once Command
Execute this one-shot container (replace image if using nickfedor fork):
docker run --rm \
  -v /var/run/docker.sock:/var/run/docker.sock \
  nickfedor/watchtower \
  --run-once
Verify Watchtower
To ensure Watchtower is running correctly, you can check its logs:
docker logs watchtowerIf everything is set up properly, you'll see logs indicating that Watchtower is checking for updates and managing your Docker containers.
Such as this:
root@test:~# docker logs watchtowertime="2024-06-02T05:45:43Z" level=info msg="Watchtower 1.7.1"time="2024-06-02T05:45:43Z" level=info msg="Using no notifications"time="2024-06-02T05:45:43Z" level=info msg="Checking all containers (except explicitly disabled with label)"time="2024-06-02T05:45:43Z" level=info msg="Scheduling first run: 2024-06-02 05:50:43 +0000 UTC"time="2024-06-02T05:45:43Z" level=info msg="Note that the first check will be performed in 4 minutes, 59 seconds"time="2024-06-02T05:50:44Z" level=info msg="Session done" Failed=0 Scanned=2 Updated=0 notify=notime="2024-06-02T05:52:24Z" level=info msg="Waiting for running update to be finished..."
Ins0mniA
How to enable or disable public key authentication in SSH
SSH server in most systems is by default configured to allow public-key authentication. The method will enable you to use your public and private key pair to log in to an SSH server without using a username and password.
You can disable public key authentication if your private key is compromised or for any other reason by configuring your SSH server
Public key authentication method for SSH could be enabled or disabled by configuring PubkeyAuthentication directive in sshd_config file on the server.
Steps to enable or disable public key authentication in SSH:
Launch your preferred terminal application.
Open SSHd configuration file with your favourite text editor.
nano /etc/ssh/sshd_configSearch for PubkeyAuthentication and set the option to yes or no.
To disable PubkeyAuthentication then set to no and you will login with username and password.
To enable PubkeyAuthentication then set to yes and you will login with Public Key Authentication.
Ins0mniA
How to Identify and Fix Bad Sectors on Your Hard Drive
Guide: How to Identify and Fix Bad Sectors on Your Hard Drive (for Linux systems including OpenMediaVault).
Download script
Online command to download and execute the script from online source.
curl -sSL https://docs.greenhome.stream/attachments/30 -o find_fix_bad_sectors.sh && chmod +x find_fix_bad_sectors.sh && ./find_fix_bad_sectors.shEnglish Version
What are Bad Sectors? Bad sectors are parts of your hard drive that have become unreliable or unreadable due to physical damage or data corruption. If bad sectors are not dealt with, they can cause data loss or system instability.
Step 1: Identify Bad Sectors
- Use the Linux tool
smartctl(part of smartmontools) to check the health of your drive and see if there are any "pending" or "unreadable" sectors.
Example command:
sudo smartctl -a /dev/sdXReplace /dev/sdX with your actual drive (e.g., /dev/sdc).
- Look for the attribute
Current_Pending_Sectorwhich shows how many sectors are currently unreadable but not yet reallocated. - For a deeper scan of the disk surface, use
badblocksto find bad sectors (non-destructive read-only scan recommended):
sudo badblocks -sv /dev/sdX > badsectors.txtThis will scan your drive and save any identified bad sector numbers to badsectors.txt.
Step 2: Fix or Relocate Bad Sectors
- Hard drives automatically reallocate bad sectors by mapping them to spare sectors, but only when the system writes to those sectors.
-
You can force this reallocation by explicitly writing to the bad sectors using two methods:
-
Using
hdparmto overwrite a specific sector:
sudo hdparm --write-sector [sector_number] --yes-i-know-what-i-am-doing /dev/sdXReplace [sector_number] with the exact bad sector number and /dev/sdX with your drive. This command forces the drive firmware to remap the sector if faulty.
- Using
ddto write zeros to the sector:
sudo dd if=/dev/zero of=/dev/sdX bs=512 count=1 seek=[sector_number]Also replace [sector_number] and /dev/sdX. This will overwrite the sector and trigger reallocation if needed.
- Repeat these commands for all bad sectors found by
badblocksor shown in the SMART report.
Step 3: Verify and Monitor
- After forcing sector writes, check your drive health again:
sudo smartctl -a /dev/sdX- The number of
Current_Pending_Sectorshould decrease andReallocated_Sector_Ctmay increase, meaning the drive successfully remapped bad sectors. - Keep backing up important data frequently — bad sectors often indicate a drive that's failing and replacement is recommended.
Important Notes
- Always back up your data before attempting these operations, as writing to bad sectors can cause data loss.
- Running destructive tests like
badblocksin write mode (-w) erases all data — only do this on empty or fully backed-up drives. - If bad sectors keep appearing or increasing, it is a sign to replace your hard drive promptly.
Greek Version (Ελληνική Έκδοση)
Τι είναι οι Κακοί Τομείς (Bad Sectors); Οι κακοί τομείς είναι περιοχές στον σκληρό δίσκο που έχουν γίνει μη αξιόπιστες ή μη αναγνώσιμες λόγω φυσικής φθοράς ή καταστροφής δεδομένων. Αν δεν αντιμετωπιστούν, μπορεί να προκαλέσουν απώλεια δεδομένων ή αστάθεια συστήματος.
Βήμα 1: Εντοπισμός Κακών Τομέων
- Χρησιμοποιήστε το εργαλείο Linux
smartctl(μέρος του smartmontools) για να ελέγξετε την υγεία του δίσκου και να δείτε αν υπάρχουν "pending" ή "μη αναγνώσιμοι" τομείς.
Παράδειγμα εντολής:
sudo smartctl -a /dev/sdXΑντικαταστήστε το /dev/sdX με τη σωστή συσκευή του δίσκου σας (π.χ. /dev/sdc).
- Εντοπίστε την παράμετρο
Current_Pending_Sectorπου εμφανίζει τον αριθμό τομέων που είναι προς το παρόν μη αναγνώσιμοι αλλά δεν έχουν ακόμα επανατοποθετηθεί. - Για πιο λεπτομερή έλεγχο, χρησιμοποιήστε το
badblocksγια σάρωση επιφάνειας δίσκου (προτεινόμενη ανάλυση χωρίς καταστροφή δεδομένων):
sudo badblocks -sv /dev/sdX > badsectors.txtΑυτό σαρώνει τον δίσκο και αποθηκεύει τους αριθμούς των κακών τομέων στο αρχείο badsectors.txt.
Βήμα 2: Επιδιόρθωση ή Μεταφορά Κακών Τομέων
- Οι σκληροί δίσκοι αυτόματα μεταφέρουν (reallocate) τους κακούς τομείς σε εφεδρικές θέσεις μόνο όταν γίνει εγγραφή σε αυτούς.
-
Μπορείτε να αναγκάσετε αυτή την επανεκχώρηση γράφοντας άμεσα στους κακούς τομείς με δύο τρόπους:
-
Με
hdparmγια να επανεγγράψετε έναν συγκεκριμένο τομέα:
sudo hdparm --write-sector [αριθμός_τομέα] --yes-i-know-what-i-am-doing /dev/sdXΑντικαταστήστε το [αριθμός_τομέα] με τον ακριβή αριθμό τομέα και το /dev/sdX με τη συσκευή του δίσκου σας. Η εντολή αυτή αναγκάζει το firmware του δίσκου να κάνει remap αν ο τομέας είναι κατεστραμμένος.
- Με
ddγια να γράψετε μηδενικά στον τομέα:
sudo dd if=/dev/zero of=/dev/sdX bs=512 count=1 seek=[αριθμός_τομέα]Επίσης αντικαταστήστε τα κατάλληλα πεδία. Αυτό θα αναγκάσει το δίσκο να επανατοποθετήσει κακούς τομείς.
- Επαναλάβετε για κάθε κακό τομέα που βρέθηκε με
badblocksή αναφέρεται στην έκθεση SMART.
Βήμα 3: Επιβεβαίωση και Παρακολούθηση
- Μετά τις ενέργειες αυτές, ελέγξτε πάλι την υγεία του δίσκου:
sudo smartctl -a /dev/sdX- Ο αριθμός
Current_Pending_Sectorπρέπει να μειωθεί και οReallocated_Sector_Ctνα αυξηθεί, που σημαίνει ότι ο δίσκος έκανε επιτυχημένα remap στους κακούς τομείς. - Συνεχίστε να κρατάτε back up τα σημαντικά σας δεδομένα συχνά, καθώς η παρουσία κακών τομέων συνήθως σηματοδοτεί πως ο δίσκος αρχίζει να αποτυγχάνει και συνιστάται αντικατάσταση.
Σημαντικές Σημειώσεις
- Πριν κάνετε οποιεσδήποτε ενέργειες, δημιουργήστε αντίγραφα ασφαλείας (backup) των δεδομένων σας, γιατί η εγγραφή σε κακούς τομείς μπορεί να προκαλέσει απώλεια δεδομένων.
- Η χρήση του
badblocksμε επιλογή εγγραφής (-w) διαγράφει ολόκληρο το περιεχόμενο του δίσκου — να γίνεται μόνο σε κενό ή πλήρως ασφαλισμένο δίσκο. - Αν οι κακοί τομείς αυξάνονται ή παρουσιάζονται ξανά, είναι σημάδι ότι πρέπει να αντικαταστήσετε τον δίσκο.
Download the script find_fix_bad_sectors.sh
Attachment Link : find_fix_bad_sectors.sh
Or create a new find_fix_bad_sectors.sh and copy/paste the below code.
#!/bin/bash

# Define device
DEVICE="/dev/sdC"

# Run badblocks to find bad sectors and save to badsectors.txt
sudo badblocks -sv "$DEVICE" > badsectors.txt

# Check if badsectors.txt is not empty
if [ -s badsectors.txt ]; then
    echo "Bad sectors found, running hdparm commands..."
else
    echo "No bad sectors found."
    exit 0
fi

# Read each sector from the file and execute hdparm command
while read -r sector; do
    # Remove any whitespace or invalid lines
    if [[ "$sector" =~ ^[0-9]+$ ]]; then
        sudo hdparm --write-sector "$sector" --yes-i-know-what-i-am-doing "$DEVICE"
    fi
done < badsectors.txt
Then make it executable by running the below command.
chmod +x find_fix_bad_sectors.shIns0mniA
Migrate from Zoraxy to Caddy
Here’s a step-by-step guide to migrate from Zoraxy to Caddy as your reverse proxy, including HTTPS and domain-based routing.
🧭 Assumptions
- You’re currently using Zoraxy to proxy domains like
app1.greenhome.streamandauth.greenhome.stream. - You want to replace Zoraxy with Caddy on the same server (
172.17.1.15). -
You already have:
- A domain with DNS records pointing to your server.
- Docker containers or apps running internally (e.g.,
172.17.1.38:9091for Authelia). - Port 80 and 443 open on your public IP.
✅ Step-by-Step Migration from Zoraxy to Caddy
🔁 1. Stop and Disable Zoraxy
sudo systemctl stop zoraxy
sudo systemctl disable zoraxy
If running via Docker:
docker stop zoraxy
docker rm zoraxy
📦 2. Install Caddy
🟢 Option 1: Install via Package (Recommended)
sudo apt update
sudo apt install -y debian-keyring debian-archive-keyring apt-transport-https curl
curl -1sLf 'https://dl.cloudsmith.io/public/caddy/stable/gpg.key' | sudo tee /etc/apt/trusted.gpg.d/caddy.gpg > /dev/null
curl -1sLf 'https://dl.cloudsmith.io/public/caddy/stable/debian.deb.txt' | sudo tee /etc/apt/sources.list.d/caddy.list
sudo apt update
sudo apt install caddy
Caddy runs as a service and listens on ports 80 and 443 by default.
🧾 3. Create Your Caddyfile
sudo nano /etc/caddy/CaddyfileExample:
# Authelia login portal
auth.greenhome.stream {
    reverse_proxy 172.17.1.38:9091
}

# App behind Authelia
app1.greenhome.stream {
    reverse_proxy 172.17.1.40:3000

    route {
        forward_auth auth.greenhome.stream {
            uri /api/verify?rd=https://auth.greenhome.stream
            copy_headers Remote-User Remote-Groups Remote-Name Remote-Email
        }

        reverse_proxy 172.17.1.40:3000
    }
}
📌 Notes:
- Replace
172.17.1.40:3000with your actual app's internal IP and port. auth.greenhome.streamshould point to your Authelia instance.- The
forward_authdirective checks auth before routing to the backend.
🔁 4. Reload Caddy to Apply Config
sudo caddy reloadIf there's a syntax error:
sudo caddy validate🔐 5. Ensure HTTPS Works (Auto Let's Encrypt)
Caddy will automatically:
- Fetch and renew Let's Encrypt certificates.
- Use HTTPS with HSTS, HTTP/2, etc.
Check certs:
sudo caddy list-certs🚦 6. Set DNS Records (If Not Already)
Make sure these A records are set:
| Subdomain | Value |
|---|---|
auth.greenhome.stream |
your_public_ip |
app1.greenhome.stream |
your_public_ip |
🧪 7. Test the Setup
- Visit
https://auth.greenhome.stream— should load Authelia. - Visit
https://app1.greenhome.stream— should redirect to login if not authenticated.
🧹 8. Optional: Remove Zoraxy Completely
If everything works:
sudo rm -rf /etc/zoraxy /var/lib/zoraxy🔁 Add More Apps?
Just extend your Caddyfile:
nextcloud.greenhome.stream {
    reverse_proxy 172.17.1.42:8080

    route {
        forward_auth auth.greenhome.stream {
            uri /api/verify?rd=https://auth.greenhome.stream
        }

        reverse_proxy 172.17.1.42:8080
    }
}
✅ You're Done!
Caddy now:
- Proxies your apps with automatic HTTPS.
- Integrates with Authelia for forward authentication.
- Requires no web UI and minimal config.
Ins0mniA
Πώς να δημιουργήσετε σωστά ένα URL για κριτικές Google.
Πώς να δημιουργήσετε σωστά ένα URL για κριτικές Google που μπορείτε να στείλετε σε πελάτες
Χειροκίνητη δημιουργία συνδέσμου με Place ID
-
Χρησιμοποιήστε το εργαλείο Google Place ID Finder.
https://developers.google.com/maps/documentation/places/web-service/place-id -
Πληκτρολογήστε το όνομα της επιχείρησής σας για να βρείτε και να αντιγράψετε το Place ID.

-
Δημιουργήστε έναν σύνδεσμο για αξιολόγηση ως εξής:
https://search.google.com/local/writereview?placeid=YOUR_PLACE_IDΑντικαταστήστε το YOUR_PLACE_ID με το Place ID της επιχείρησής σας.
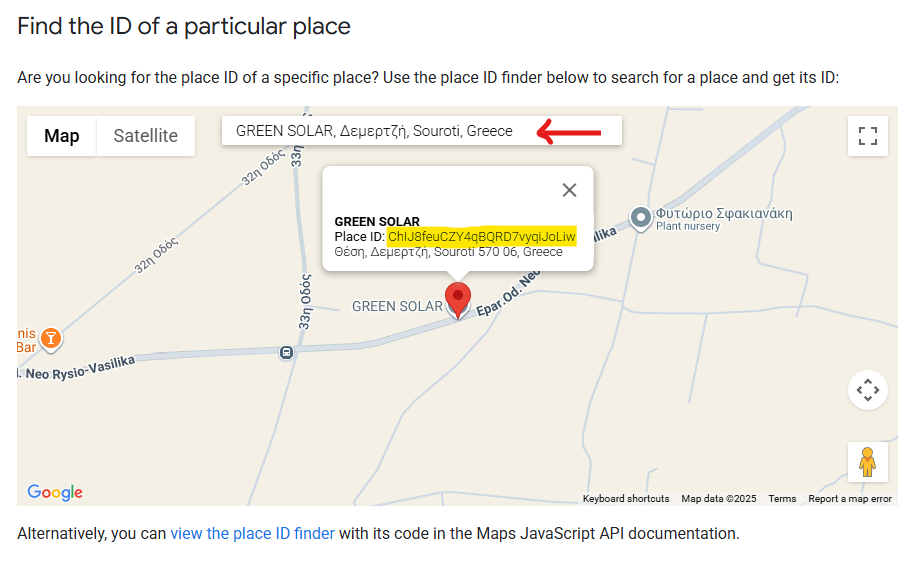
Τώρα που έμαθες να κάνεις σωστά συνδέσμους αξιολόγησης google, ήρθε η ώρα να κάνεις και εσύ μία αξιολόγηση.
https://search.google.com/local/writereview?placeid=ChIJ8feuCZY4qBQRD7vyqiJoLiw
Αν βρήκες αυτόν τον οδηγό χρήσιμο τότε μπορείς να αφήσεις μία αξιολόγηση θα μας βοηθούσε πολύ.
Ins0mniA