Scripts
Several Linux Bash shell scripts
- Empty ALL LOGs on a Linux Server
- Auto Update - Upgrade a Linux machine
- Disk Space Monitoring Script to HA
- Linux Shell Script for VM Health Monitoring
- Universal Health Monitor - Configuration File Based
- Enable SSH access for root.
- Debian Full upgrade to the latest OS release automatically
- Filesystem Forced fsck all disks.
- TimeZone Date Time for Debian and Ubuntu.
- Install Qemu-guest-agent on Debian / Ubuntu
Empty ALL LOGs on a Linux Server
Download Script proxmox_subscription_autofix.sh
🚀 One-Line Download & Execute:
clear && curl -fsSL https://docs.greenhome.stream/attachments/2 -o empty_log_files.sh && chmod +x empty_log_files.sh && clear && ./empty_log_files.shThe below script is scan all the Linux Server from the [ / ] root folder of the system and all its sub directories for files with extension .log
Then it will make a file with filename "log-files-list.txt" and add line by line every log file it finds with it complete path.
After make the file "log-files-list.txt" then it takes line by line every log file and empty it, at then end it delete the file "log-files-list.txt".
Creating the script
Open the terminal and type the below command :
nano empty_log_files.shand then copy / paste the below code inside the file "empty_log_files.sh"
#!/bin/bash
clear
# Filename for log files list
LOG_FILE_LIST="log-files-list.txt"

# Function to find and list log files
find_log_files() {
    echo "Scanning for log files from /..."
    # Use find to locate files with `.log` extension
    find / -type f -name "*.log" > "$LOG_FILE_LIST"

    if [ $? -eq 0 ]; then
        echo "Log files found and saved to $LOG_FILE_LIST."
    else
        echo "Failed to search for log files."
        exit 1
    fi
}

# Function to empty log files
empty_log_files() {
    echo "Emptying the log files listed in $LOG_FILE_LIST..."
    # Read through the log file list and empty each log file
    while IFS= read -r log_file; do
        if [ -f "$log_file" ]; then
            > "$log_file" # Empty the log file
            echo "Emptied: $log_file"
        else
            echo "Warning: $log_file does not exist or is not a file."
        fi
    done < "$LOG_FILE_LIST"
}

# Main script execution
find_log_files
empty_log_files
rm log-files-list.txt
echo "Completed processing log files."
then press Ctrl + x it will prompt you [ Save modified buffer? ] press y and enter
Make the script executable
After that you need to make the script executable, so you will write the below command :
chmod +x empty_log_files.shAdd the script to cron job to run automatically
To run the script every 5 minutes follow the below steps, you can change the minutes according to your need.
crontab -ethen go at the end of the file and add the below line, change the your_path with your folder where the script is locate.
*/5 * * * * /your_path/empty_log_files.sh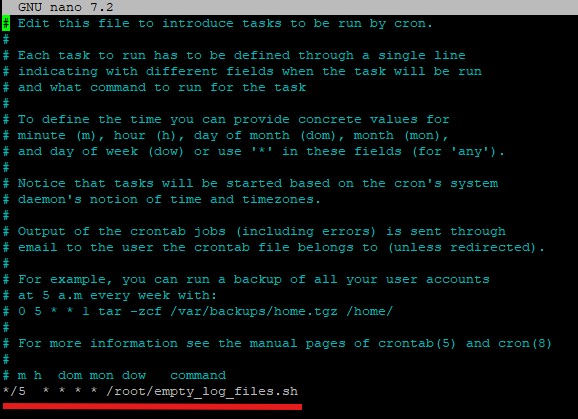
then press Ctrl + x it will prompt you [ Save modified buffer? ] press y and enter
You are done the script in the location /your_path/empty_log_files.sh it will automatically run every 5 minutes.
Download the script empty_log_files.sh
Attachment Link empty_log_files.sh
Ins0mniA
Auto Update - Upgrade a Linux machine
Download Script os-update.sh
🚀 One-Line Download & Execute:
The below script is to auto update - upgrade - remove - clean and auto add a cronjob at Linux machine or Server.
Also add a cron job to run every Saturday on 09:00.
apt update && apt install -y curl && clear && curl -fsSL https://docs.greenhome.stream/attachments/42 -o os-update.sh && chmod +x os-update.sh && clear && ./os-update.shCreating the script
Open the terminal and type the below command :
nano os-update.shand then copy / paste the below code inside the file "os-update.sh"
#!/bin/bash

# Clear the terminal for cleanliness
clear

# Function to handle errors
handle_error() {
    echo "Error occurred while executing: $1"
    exit 1
}

# Function to add the cron job
add_cron_job() {
    # Define the cron job
    cron_job="0 9 * * 6 /root/os-update.sh"

    # Check if the cron job already exists
    (crontab -l 2>/dev/null | grep -qF "$cron_job") || {
        # If not, add it to the crontab
        (crontab -l 2>/dev/null; echo "$cron_job") | crontab - || {
            echo "Failed to add the cron job."
            exit 1
        }
        echo "Cron job added successfully: '$cron_job'"
    }
}

echo "============================================"
echo "       Automatic System Maintenance         "
echo "============================================"

# Get updates
echo "Step 1: Getting Updates..."
echo "--------------------------------------------"
sleep 1
DEBIAN_FRONTEND=noninteractive apt-get update -qq || handle_error "apt-get update"

echo "________________________________________________"
sleep 1

# Installing updates
echo "Step 2: Installing Updates..."
echo "--------------------------------------------"
sleep 1
DEBIAN_FRONTEND=noninteractive apt-get dist-upgrade -y -q || handle_error "apt-get dist-upgrade"

echo "________________________________________________"
sleep 1

# Auto remove unnecessary packages
echo "Step 3: Auto Removing Unused Packages..."
echo "--------------------------------------------"
sleep 1
DEBIAN_FRONTEND=noninteractive apt-get autoremove -y -q || handle_error "apt-get autoremove"

echo "________________________________________________"
sleep 1

# Clean up old package files
echo "Step 4: Cleaning Up Unused Package Files..."
echo "--------------------------------------------"
sleep 1
DEBIAN_FRONTEND=noninteractive apt-get clean -q || handle_error "apt-get clean"
DEBIAN_FRONTEND=noninteractive apt-get autoclean -y -q || handle_error "apt-get autoclean"

echo "________________________________________________"
sleep 1

# Add Cron Job before reboot
add_cron_job

# Prepare for reboot
clear
echo "============================================"
echo "           System Maintenance Complete      "
echo "============================================"
echo "System will REBOOT in 30 seconds..."
sleep 30

# Reboot the system
reboot
then press Ctrl + x it will prompt you [ Save modified buffer? ] press y and enter
Make the script executable
After that you need to make the script executable, so you will write the below command :
chmod +x os-update.shAdd the script to cron job to run automatically
To run the script daily follow the below steps, you can change according to your need.
crontab -ethen go at the end of the file and add the below line, change the your_path with your folder where the script is locate.
@daily /your_path/os-update.sh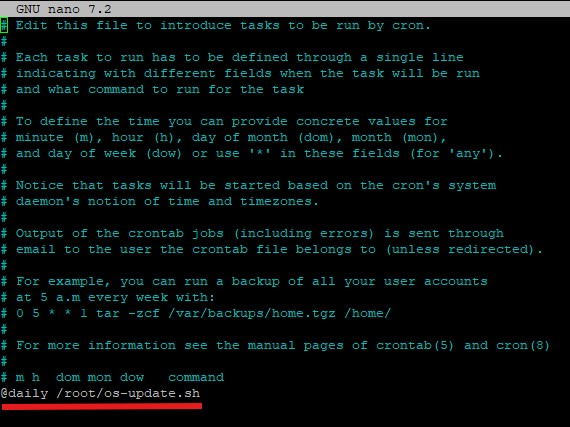
then press Ctrl + x it will prompt you [ Save modified buffer? ] press y and enter
You are done the script in the location /your_path/os-update.sh it will automatically run daily.
Download the script os-update.sh
Attachment Link os-update.sh
Ins0mniA
Disk Space Monitoring Script to HA
Download Script proxmox_subscription_autofix.sh
🚀 One-Line Download & Execute
clear && curl -fsSL https://docs.greenhome.stream/attachments/23 -o monitor_disk_space_to_ha.sh && chmod +x os-update.shCreate the script file.
Disk Space Monitoring Script and inform Home Assistant with an entity.
nano monitor_disk_space_to_ha.shand copy / paste the below code inside the script file monitor_disk_space_to_ha.sh
# Home Assistant Settings
url_base="https://<your domain>/api/states"
token="IsImlcwNzIzOTE0MyoxNzA3MjM5MTR9..."

# Server name
srv_name="vps_server"

# Constants for device info
DEVICE_IDENTIFIERS='["amnisia_server"]'
DEVICE_NAME="Server Disk Space Monitor"
DEVICE_MANUFACTURER="Amnisia"
DEVICE_MODEL="Disk Monitor"

# Function to send data to Home Assistant
send_to_ha() {
  local sensor_name=$1
  local value=$2
  local friendly_name=$3
  local icon=$4
  local unique_id=$5
  local url="${url_base}/${sensor_name}"
  local device_info="{\"identifiers\":${DEVICE_IDENTIFIERS},\"name\":\"${DEVICE_NAME}\",\"manufacturer\":\"${DEVICE_MANUFACTURER}\",\"model\":\"${DEVICE_MODEL}\"}"
  local payload="{\"state\":\"${value}\",\"attributes\":{\"friendly_name\":\"${friendly_name}\",\"icon\":\"${icon}\",\"device\":${device_info}}}"
  curl -X POST -H "Authorization: Bearer ${token}" -H 'Content-Type: application/json' --data "${payload}" "${url}"
}

# Function to check disk space
check_disk_space() {
  # Get disk space usage and free space
  disk_usage_kb=$(df / | awk 'NR==2 {print $3}')  # Used space in KB
  disk_free_kb=$(df / | awk 'NR==2 {print $4}')   # Free space in KB

  # Convert KB to GB
  disk_usage_gb=$(df / | awk 'NR==2 {printf "%.2f", $3/1024/1024}')  # Used space in GB
  disk_free_gb=$(df / | awk 'NR==2 {printf "%.2f", $4/1024/1024}')   # Free space in GB
  # Send disk usage and free space to Home Assistant
  send_to_ha "sensor.${srv_name}_disk_usage" "${disk_usage_gb}" "Disk Used Space (GB)" "mdi:harddisk" "${srv_name}_disk_usage"
  send_to_ha "sensor.${srv_name}_disk_free" "${disk_free_gb}" "Disk Free Space (GB)" "mdi:harddisk" "${srv_name}_disk_free"
}

# Run the function to check disk space
check_disk_space
Download the script.
Attachment link : monitor_disk_space_to_ha.sh
Ins0mniA
Linux Shell Script for VM Health Monitoring
Linux Shell Script for VM Health Monitoring
I've created two shell scripts for you to monitor the VoIP service and automatically reboot your Proxmox VM when needed.
Simple Version.
Here's the basic script that does exactly what you asked for:
#!/bin/bash

# Simple VM Health Monitor
# Checks if http://www.your-domain.com responds, reboots VM 105 if not

URL="http://www.your-domain.com"
VM_ID="105"

# Check if URL responds (with 10 second timeout)
if ! curl -s --connect-timeout 10 --max-time 10 "$URL" > /dev/null 2>&1; then
    echo "$(date): Service not responding, rebooting VM $VM_ID"
    qm reboot "$VM_ID" && sleep 30 && qm start "$VM_ID"
    echo "$(date): VM reboot completed"
else
    echo "$(date): Service is responding normally"
fi
Enhanced Version (Production Ready)
#!/bin/bash

# VM Health Monitor Script
# This script checks if a web service is responding and reboots the VM if it's not

# Configuration
TARGET_URL="http://www.your-domain.com"
VM_ID="105"
TIMEOUT=10
MAX_RETRIES=3
LOG_FILE="/var/log/vm-health-monitor.log"

# Function to log messages with timestamp
log_message() {
    echo "$(date '+%Y-%m-%d %H:%M:%S') - $1" | tee -a "$LOG_FILE"
}

# Function to check if URL is responding
check_url() {
    local url="$1"
    local timeout="$2"

    # Use curl to check if the URL responds
    if curl -s --connect-timeout "$timeout" --max-time "$timeout" "$url" > /dev/null 2>&1; then
        return 0  # Success
    else
        return 1  # Failure
    fi
}

# Function to reboot VM
reboot_vm() {
    local vm_id="$1"

    log_message "Attempting to reboot VM $vm_id"

    # Stop the VM first
    if qm stop "$vm_id"; then
        log_message "VM $vm_id stopped successfully"
        sleep 30

        # Start the VM
        if qm start "$vm_id"; then
            log_message "VM $vm_id started successfully"
            return 0
        else
            log_message "ERROR: Failed to start VM $vm_id"
            return 1
        fi
    else
        log_message "ERROR: Failed to stop VM $vm_id"
        return 1
    fi
}

# Main monitoring function
main() {
    log_message "Starting health check for $TARGET_URL"

    local retry_count=0

    # Retry loop
    while [ $retry_count -lt $MAX_RETRIES ]; do
        if check_url "$TARGET_URL" "$TIMEOUT"; then
            log_message "Service is responding normally (attempt $((retry_count + 1))/$MAX_RETRIES)"
            exit 0
        else
            retry_count=$((retry_count + 1))
            log_message "Service not responding (attempt $retry_count/$MAX_RETRIES)"

            if [ $retry_count -lt $MAX_RETRIES ]; then
                sleep 5
            fi
        fi
    done

    # If we reach here, all retries failed
    log_message "Service failed to respond after $MAX_RETRIES attempts. Initiating VM reboot."

    if reboot_vm "$VM_ID"; then
        log_message "VM reboot completed successfully"
    else
        log_message "VM reboot failed - manual intervention required"
        exit 1
    fi
}

# Check if running as root (required for qm commands)
if [ "$EUID" -ne 0 ]; then
    echo "This script must be run as root (required for Proxmox qm commands)"
    exit 1
fi

# Create log directory if it doesn't exist
mkdir -p "$(dirname "$LOG_FILE")"

# Run main function
main

exit 0
Installation and Usage
1. Save the Script
Save either script to a file (e.g., vm-health-monitor.sh) on your Proxmox host:
nano vm-health-monitor.shPaste the script content
2. Make it Executable
chmod +x vm-health-monitor.sh3. Test the Script
sudo ./vm-health-monitor.sh4. Set up Automatic Monitoring (Cron Job)
To run the script automatically every 5 minutes:
sudo crontab -eAdd this line:
*/5 * * * * /path/to/vm-health-monitor.sh >> /var/log/vm-monitor.log 2>&1Key Features
Simple Script:
- Direct implementation of your requirements
- Uses curl to check if the URL responds
- Executes qm reboot 105 && sleep 30 && qm start 105 if the service is down
- Minimal logging with timestamps
Enhanced Script:
- Retry Logic: Attempts 3 times before declaring service down
- Comprehensive Logging: Detailed logs with timestamps
- Error Handling: Proper error checking for VM operations
- Root Check: Ensures script runs with proper privileges
- Graceful Shutdown: Uses qm stop before qm start for cleaner reboot
Important Notes
- Root Privileges Required: The qm command requires root access, so run the script as root or with sudo
- Curl Dependency: Ensure curl is installed on your Proxmox host
- Network Timeout: Set to 10 seconds to avoid hanging on network issues
- VM ID: Currently set to 105 as specified - modify if needed
- Logging: Enhanced version logs to /var/log/vm-health-monitor.log
Both scripts will effectively monitor your VoIP service and automatically reboot VM 105 when the service becomes unresponsive, ensuring minimal downtime for your infrastructure.
Download the scripts.
Simple version
Attachment link : vm_health_monitoring_simple.sh
Enhanced version
Attachment link : vm_health_monitoring_enhanced.sh
Ins0mniA
Universal Health Monitor - Configuration File Based
Download Script universal-health-monitor.sh
🚀 One-Line Download & Execute
clear && curl -fsSL https://docs.greenhome.stream/attachments/26 -o universal-health-monitor.sh && chmod +x universal-health-monitor.sh && clear && curl -fsSL https://docs.greenhome.stream/attachments/27 -o monitor-domains.txt && chmod +x /root/universal-health-monitor.sh && (crontab -l 2>/dev/null | grep -v "/root/universal-health-monitor.sh"; echo "*/5 * * * * /root/universal-health-monitor.sh") | crontab - && ./universal-health-monitor.shScript - Universal Health Monitor - Configuration File Based
A completely universal solution that reads from a configuration file, so users never need to touch the code.
1. Main Script: universal-health-monitor.sh
Create the script file universal-health-monitor.sh
nano /root/universal-health-monitor.shAdd the below code by simply copy and paste it inside the file universal-health-monitor.sh
#!/bin/bash

# Universal Multi-Domain Multi-Machine Health Monitor Script
# This script reads domain configurations from monitor-domains.txt and monitors accordingly

# Configuration
CONFIG_FILE="monitor-domains.txt"
SCRIPT_DIR="$(cd "$(dirname "${BASH_SOURCE[0]}")" && pwd)"
LOG_FILE="$SCRIPT_DIR/vm-health-monitor.log"
TIMEOUT=10
MAX_RETRIES=3
STOP_START_DELAY=5

# Function to log messages with timestamp
log_message() {
    echo "$(date '+%Y-%m-%d %H:%M:%S') - $1" | tee -a "$LOG_FILE"
}

# Function to check if URL is responding
check_url() {
    local url="$1"
    local timeout="$2"

    # Add http:// if not present
    if [[ ! "$url" =~ ^https?:// ]]; then
        url="http://$url"
    fi

    # Use curl with options for both HTTP and HTTPS
    if curl -s -k -L --connect-timeout "$timeout" --max-time "$timeout" "$url" > /dev/null 2>&1; then
        return 0  # Success
    else
        return 1  # Failure
    fi
}

# Function to check if VM/LXC is running
check_machine_status() {
    local machine_id="$1"
    local machine_type="$2"

    case "$machine_type" in
        "vm")
            if qm status "$machine_id" | grep -q "status: running"; then
                return 0  # Running
            else
                return 1  # Not running
            fi
            ;;
        "lxc")
            if pct status "$machine_id" | grep -q "status: running"; then
                return 0  # Running
            else
                return 1  # Not running
            fi
            ;;
        *)
            log_message "ERROR: Unknown machine type '$machine_type'"
            return 1
            ;;
    esac
}

# Function to stop machine
stop_machine() {
    local machine_id="$1"
    local machine_type="$2"
    local domain="$3"

    log_message "Attempting to stop $machine_type $machine_id for domain $domain"

    case "$machine_type" in
        "vm")
            if qm stop "$machine_id"; then
                log_message "✓ VM $machine_id stop command executed successfully"

                # Wait and verify it stopped
                local wait_count=0
                while [ $wait_count -lt 30 ]; do  # Wait up to 30 seconds
                    if ! check_machine_status "$machine_id" "$machine_type"; then
                        log_message "✓ VM $machine_id confirmed stopped"
                        return 0
                    fi
                    sleep 1
                    ((wait_count++))
                done

                log_message "⚠ VM $machine_id stop command executed but status verification timed out"
                return 0  # Command succeeded even if verification timed out
            else
                log_message "✗ Failed to execute stop command for VM $machine_id"
                return 1
            fi
            ;;
        "lxc")
            if pct stop "$machine_id"; then
                log_message "✓ LXC $machine_id stop command executed successfully"

                # Wait and verify it stopped
                local wait_count=0
                while [ $wait_count -lt 30 ]; do  # Wait up to 30 seconds
                    if ! check_machine_status "$machine_id" "$machine_type"; then
                        log_message "✓ LXC $machine_id confirmed stopped"
                        return 0
                    fi
                    sleep 1
                    ((wait_count++))
                done

                log_message "⚠ LXC $machine_id stop command executed but status verification timed out"
                return 0  # Command succeeded even if verification timed out
            else
                log_message "✗ Failed to execute stop command for LXC $machine_id"
                return 1
            fi
            ;;
    esac
}

# Function to start machine
start_machine() {
    local machine_id="$1"
    local machine_type="$2"
    local domain="$3"

    log_message "Attempting to start $machine_type $machine_id for domain $domain"

    case "$machine_type" in
        "vm")
            if qm start "$machine_id"; then
                log_message "✓ VM $machine_id start command executed successfully"

                # Wait and verify it started
                local wait_count=0
                while [ $wait_count -lt 60 ]; do  # Wait up to 60 seconds for start
                    if check_machine_status "$machine_id" "$machine_type"; then
                        log_message "✓ VM $machine_id confirmed running"
                        return 0
                    fi
                    sleep 1
                    ((wait_count++))
                done

                log_message "⚠ VM $machine_id start command executed but status verification timed out"
                return 0  # Command succeeded even if verification timed out
            else
                log_message "✗ Failed to execute start command for VM $machine_id"
                return 1
            fi
            ;;
        "lxc")
            if pct start "$machine_id"; then
                log_message "✓ LXC $machine_id start command executed successfully"

                # Wait and verify it started
                local wait_count=0
                while [ $wait_count -lt 60 ]; do  # Wait up to 60 seconds for start
                    if check_machine_status "$machine_id" "$machine_type"; then
                        log_message "✓ LXC $machine_id confirmed running"
                        return 0
                    fi
                    sleep 1
                    ((wait_count++))
                done

                log_message "⚠ LXC $machine_id start command executed but status verification timed out"
                return 0  # Command succeeded even if verification timed out
            else
                log_message "✗ Failed to execute start command for LXC $machine_id"
                return 1
            fi
            ;;
    esac
}

# Function to restart machine
restart_machine() {
    local machine_id="$1"
    local machine_type="$2"
    local domain="$3"

    log_message "=== INITIATING RESTART SEQUENCE FOR $domain ($machine_type $machine_id) ==="

    # Stop the machine
    if stop_machine "$machine_id" "$machine_type" "$domain"; then
        log_message "Waiting $STOP_START_DELAY seconds before starting..."
        sleep "$STOP_START_DELAY"

        # Start the machine
        if start_machine "$machine_id" "$machine_type" "$domain"; then
            log_message "=== RESTART SEQUENCE COMPLETED SUCCESSFULLY FOR $domain ==="
            return 0
        else
            log_message "=== RESTART SEQUENCE FAILED AT START PHASE FOR $domain ==="
            return 1
        fi
    else
        log_message "=== RESTART SEQUENCE FAILED AT STOP PHASE FOR $domain ==="
        return 1
    fi
}

# Function to parse config line
parse_config_line() {
    local line="$1"

    # Remove leading/trailing whitespace
    line=$(echo "$line" | sed 's/^[[:space:]]*//;s/[[:space:]]*$//')

    # Skip empty lines and comments
    if [[ -z "$line" ]] || [[ "$line" =~ ^# ]]; then
        return 1
    fi

    # Parse format: 'domain','type','id'
    if [[ "$line" =~ ^\'([^\']+)\',\'([^\']+)\',\'([^\']+)\'$ ]]; then
        PARSED_DOMAIN="${BASH_REMATCH[1]}"
        PARSED_TYPE="${BASH_REMATCH[2]}"
        PARSED_ID="${BASH_REMATCH[3]}"
        return 0
    else
        log_message "ERROR: Invalid line format: $line"
        return 1
    fi
}

# Function to validate config file
validate_config_file() {
    local config_file="$1"
    local errors=0
    local line_number=0

    if [[ ! -f "$config_file" ]]; then
        log_message "ERROR: Configuration file '$config_file' not found"
        return 1
    fi

    log_message "Validating configuration file: $config_file"

    while IFS= read -r line; do
        ((line_number++))

        # Skip empty lines and comments
        if [[ -z "$(echo "$line" | sed 's/^[[:space:]]*//;s/[[:space:]]*$//')" ]] || [[ "$line" =~ ^[[:space:]]*# ]]; then
            continue
        fi

        if parse_config_line "$line"; then
            # Validate domain
            if [[ -z "$PARSED_DOMAIN" ]]; then
                log_message "ERROR: Empty domain at line $line_number"
                ((errors++))
            fi

            # Validate type
            if [[ "$PARSED_TYPE" != "vm" ]] && [[ "$PARSED_TYPE" != "lxc" ]]; then
                log_message "ERROR: Invalid machine type '$PARSED_TYPE' at line $line_number (must be 'vm' or 'lxc')"
                ((errors++))
            fi

            # Validate ID
            if [[ ! "$PARSED_ID" =~ ^[0-9]+$ ]]; then
                log_message "ERROR: Invalid machine ID '$PARSED_ID' at line $line_number (must be numeric)"
                ((errors++))
            fi
        else
            if [[ ! "$line" =~ ^[[:space:]]*# ]] && [[ -n "$(echo "$line" | sed 's/^[[:space:]]*//;s/[[:space:]]*$//')" ]]; then
                log_message "ERROR: Invalid format at line $line_number: $line"
                ((errors++))
            fi
        fi
    done < "$config_file"

    if [ $errors -gt 0 ]; then
        log_message "Configuration validation failed with $errors errors"
        return 1
    else
        log_message "Configuration validation passed"
        return 0
    fi
}

# Function to monitor single domain
monitor_domain() {
    local domain="$1"
    local machine_type="$2"
    local machine_id="$3"

    log_message "Monitoring $domain -> $machine_type $machine_id"

    local retry_count=0
    local domain_failed=true

    # Retry loop for this domain
    while [ $retry_count -lt $MAX_RETRIES ]; do
        if check_url "$domain" "$TIMEOUT"; then
            log_message "✓ $domain is responding (attempt $((retry_count + 1))/$MAX_RETRIES)"
            domain_failed=false
            break
        else
            retry_count=$((retry_count + 1))
            if [ $retry_count -lt $MAX_RETRIES ]; then
                log_message "⚠ $domain not responding (attempt $retry_count/$MAX_RETRIES) - retrying in 5 seconds..."
                sleep 5
            fi
        fi
    done

    if [ "$domain_failed" = true ]; then
        log_message "✗ $domain failed after $MAX_RETRIES attempts"
        log_message "Initiating restart for $machine_type $machine_id due to $domain failure"

        if restart_machine "$machine_id" "$machine_type" "$domain"; then
            log_message "Successfully restarted $machine_type $machine_id for $domain"
            return 0
        else
            log_message "Failed to restart $machine_type $machine_id for $domain - manual intervention required"
            return 1
        fi
    else
        log_message "✓ $domain is healthy - no action needed for $machine_type $machine_id"
        return 0
    fi
}

# Main function
main() {
    log_message "========================================"
    log_message "Starting Universal Multi-Domain Health Monitor"
    log_message "Script directory: $SCRIPT_DIR"
    log_message "Configuration file: $CONFIG_FILE"
    log_message "Log file: $LOG_FILE"
    log_message "========================================"

    # Check if config file exists in script directory
    local config_path="$SCRIPT_DIR/$CONFIG_FILE"

    if [[ ! -f "$config_path" ]]; then
        log_message "ERROR: Configuration file not found at $config_path"
        log_message "Please create $CONFIG_FILE in the same directory as this script"
        exit 1
    fi

    # Validate configuration
    if ! validate_config_file "$config_path"; then
        log_message "Exiting due to configuration errors"
        exit 1
    fi

    local total_domains=0
    local successful_operations=0
    local failed_operations=0

    # Process each line in config file
    while IFS= read -r line; do
        # Skip empty lines and comments
        if [[ -z "$(echo "$line" | sed 's/^[[:space:]]*//;s/[[:space:]]*$//')" ]] || [[ "$line" =~ ^[[:space:]]*# ]]; then
            continue
        fi

        if parse_config_line "$line"; then
            ((total_domains++))
            log_message "----------------------------------------"

            if monitor_domain "$PARSED_DOMAIN" "$PARSED_TYPE" "$PARSED_ID"; then
                ((successful_operations++))
            else
                ((failed_operations++))
            fi
        fi
    done < "$config_path"

    log_message "========================================"
    log_message "Health check completed"
    log_message "Total domains monitored: $total_domains"
    log_message "Successful operations: $successful_operations"
    log_message "Failed operations: $failed_operations"
    log_message "========================================"

    if [ $failed_operations -gt 0 ]; then
        log_message "WARNING: $failed_operations operation(s) failed - manual intervention may be required"
        exit 1
    else
        log_message "All monitored services are healthy or successfully restarted"
        exit 0
    fi
}

# Check if running as root
if [ "$EUID" -ne 0 ]; then
    echo "This script must be run as root (required for Proxmox qm/pct commands)"
    exit 1
fi

# Check dependencies
command -v curl >/dev/null 2>&1 || {
    echo "Error: curl is not installed. Please install curl first."
    exit 1
}

command -v qm >/dev/null 2>&1 || {
    echo "Error: qm command not found. This script must run on a Proxmox host."
    exit 1
}

command -v pct >/dev/null 2>&1 || {
    echo "Error: pct command not found. This script must run on a Proxmox host."
    exit 1
}

# Run main function
main

exit 0
2. Configuration File: monitor-domains.txt
The user only needs to edit this file - no code touching required!
# Monitor Domains Configuration File
# Format: 'domain','type','id'
#
# domain: The domain or IP to monitor (with or without http://)
# type: Either 'vm' or 'lxc'
# id: The numeric ID of the VM or LXC container
#
# Examples:
'www.domain-1.com','vm','101'
'www.domain-2.com','vm','102'
'www.domain-3.com','lxc','103'
'www.domain-4.com','lxc','104'
'192.168.1.100:8080','vm','105'
'api.example.com','lxc','106'
'https://secure.domain.com','vm','107'

# You can add comments like this
# 'disabled.domain.com','vm','108'

# Multiple entries are supported
'service1.local','vm','201'
'service2.local:9000','lxc','202'
Key Features
✅ User-Friendly Configuration
- Zero code modification needed
- Simple text file editing
- Clear format with examples and comments
- Automatic validation with helpful error messages
✅ Flexible Domain Support
- Supports domains with or without protocol (domain.com or https://domain.com)
- IP addresses with ports (192.168.1.100:8080)
- Automatic http:// addition if missing
✅ Complete Status Verification
- Executes qm stop XXX / pct stop XXX
- Verifies the machine actually stopped
- Waits 5 seconds (configurable delay)
- Executes qm start XXX / pct start XXX
- Verifies the machine actually started
✅ Comprehensive Logging
- Log file created in same directory as script: vm-health-monitor.log
- Timestamped entries
- Status indicators (✓, ✗, ⚠)
- Detailed restart sequences
- Success/failure tracking
Installation & Usage
1. Setup Files
Place both files in the same directory (e.g., /root/)
/root/universal-health-monitor.sh
/root/monitor-domains.txt
2. Configure Your Domains
Edit monitor-domains.txt:
nano monitor-domains.txtAdd your domains using the exact format:
'your-domain.com','vm','101'
'192.168.1.50:8080','lxc','103'
'https://api.mysite.com','vm','105'
3. Make Executable & Test
chmod +x universal-health-monitor.sh
sudo ./universal-health-monitor.sh
4. Automate with Cron
crontab -eAdd the below line at the end of the file:
*/5 * * * * /root/universal-health-monitor.shConfiguration Format Rules
✅ Valid Formats:
'domain.com','vm','101'
'192.168.1.100:8080','lxc','102'
'https://secure.com','vm','103'
'www.example.com','lxc','104'
❌ Invalid Formats:
domain.com,vm,101              # Missing quotes
'domain.com','VM','101'        # Wrong case (must be lowercase)
'domain.com','vm',101          # ID not quoted
'','vm','101'                  # Empty domain
'domain.com','server','101'    # Invalid type (must be 'vm' or 'lxc')
Sample Log Output
2025-08-03 18:45:01 - Starting Universal Multi-Domain Health Monitor
2025-08-03 18:45:01 - Configuration validation passed
2025-08-03 18:45:01 - ----------------------------------------
2025-08-03 18:45:01 - Monitoring www.domain-1.com -> vm 101
2025-08-03 18:45:02 - ✓ www.domain-1.com is responding (attempt 1/3)
2025-08-03 18:45:02 - ✓ www.domain-1.com is healthy - no action needed for vm 101
2025-08-03 18:45:02 - ----------------------------------------
2025-08-03 18:45:02 - Monitoring www.domain-2.com -> vm 102
2025-08-03 18:45:05 - ⚠ www.domain-2.com not responding (attempt 1/3) - retrying in 5 seconds...
2025-08-03 18:45:15 - ✗ www.domain-2.com failed after 3 attempts
2025-08-03 18:45:15 - === INITIATING RESTART SEQUENCE FOR www.domain-2.com (vm 102) ===
2025-08-03 18:45:15 - Attempting to stop vm 102 for domain www.domain-2.com
2025-08-03 18:45:18 - ✓ VM 102 stop command executed successfully
2025-08-03 18:45:19 - ✓ VM 102 confirmed stopped
2025-08-03 18:45:24 - Attempting to start vm 102 for domain www.domain-2.com
2025-08-03 18:45:26 - ✓ VM 102 start command executed successfully
2025-08-03 18:45:35 - ✓ VM 102 confirmed running
2025-08-03 18:45:35 - === RESTART SEQUENCE COMPLETED SUCCESSFULLY FOR www.domain-2.com ===
This solution is completely universal - users only need to edit the simple text configuration file, never touching any code!
Download the files
Script universal-health-monitor.sh
Attachment link : universal-health-monitor.sh
Text file monitor-domains.txt
Attachment link : monitor-domains.txt
Ins0mniA
Enable SSH access for root.
🚀 One-Line Download & Execute :
apt update && apt install -y curl && clear && curl -s https://docs.greenhome.stream/attachments/38 | bashOR
apt update && apt install -y wget && clear && wget -q https://docs.greenhome.stream/attachments/38 && bash enable_root_ssh.sh && rm -f enable_root_ssh.shTo enable root SSH login on a Linux system, follow these steps :
- Log in to your server with an account that has sudo or root privileges.
- Set or confirm the root password if needed :
sudo passwd rootEnter and confirm the new root password.
- Edit the SSH daemon configuration file :
sudo nano /etc/ssh/sshd_config - Find the line containing PermitRootLogin. It may be commented out with a #. Change or add this line :
PermitRootLogin yes - Save the file and exit the editor.
- Restart the SSH service to apply the changes :
orsudo systemctl restart sshd
sudo service sshd restart - You can now log in remotely as root using SSH :
ssh root@your-server-ipEnter the root password when prompted.
Important Security Note :
Enabling root login over SSH is a security risk. It’s recommended to use normal user accounts with sudo privileges instead. If you enable root SSH login, consider using SSH key authentication and strong passwords to improve security.
This method applies to most Linux distributions, including Ubuntu, Debian, CentOS, Rocky Linux, and others. Some systems may use slightly different service names or editors, but the main steps remain the same.
Ins0mniA
Debian Full upgrade to the latest OS release automatically
🚀 One-Line Execute:
apt update && apt install -y curl && clear && curl -s https://docs.greenhome.stream/attachments/41 | bash✅ What This Script Does
This script checks your system and performs a full upgrade to the latest OS release automatically, including repository updates and cleanup.
🔧 Step-by-Step Breakdown:
- Check and install required utilities (
lsb-release) if missing. - Update the system package index (
apt update) and report if updates are available. - Upgrade current packages using
apt upgradein non-interactive mode. - Display current OS information (distro name, version, codename).
- Check if a newer OS release is available (e.g., Debian 13, Ubuntu 24).
-
If a newer release is available:
- Check if it's already in
/etc/apt/sources.list. - If not, update sources to point to the new release.
- Run
apt updateagain to refresh package index. - Perform a full system upgrade (
apt full-upgrade) non-interactively.
- Check if it's already in
- Remove old/unused packages using
apt autoremove. - Clean cached packages using
apt autocleanandapt clean. - Display final OS release information after upgrade is complete.
🛡️ The script is fully automated and handles all prompts silently — no user interaction required except for an optional reboot (not forced by the script).
Ins0mniA
Filesystem Forced fsck all disks.
Download Script proxmox_subscription_autofix.sh
🚀 One-Line Download & Execute:
apt update && apt install -y curl && clear && curl -s https://docs.greenhome.stream/attachments/57 | bashThe script does:
- Detects all
ext4filesystems (including LVM volumes) - Forces a one-time filesystem check at next boot using
tune2fs -c 1 - Ensures
/etc/fstabstays exactly like it was, without changing anything - Reboots the system with
fsckforced
✅ Final Script — force_fsck_all.sh
#!/bin/bash

echo "🔍 Detecting all ext4 filesystems..."
FILESYSTEMS=$(lsblk -pn -o FSTYPE,NAME | awk '$1 == "ext4" { print $2 }')

echo
echo "🛠️  Forcing fsck on next boot for these filesystems:"
echo "$FILESYSTEMS"
echo

for FS in $FILESYSTEMS; do
    echo "→ Setting fsck trigger for $FS"
    tune2fs -c 1 "$FS"
done

echo
echo "✅ Done. /etc/fstab was not modified."

echo
read -p "⚠️  Reboot now to run fsck on next boot? (y/N): " confirm
if [[ "$confirm" =~ ^[Yy]$ ]]; then
    echo "🔁 Rebooting with forced fsck..."
    shutdown -rF now
else
    echo "❌ Reboot skipped. Run 'shutdown -rF now' manually when ready."
fi
🚀 How to Use
-
Create the script:
nano force_fsck_all.shPaste the script above. Save (Ctrl+O, Enter) and exit (Ctrl+X).
-
Make it executable:
chmod +x force_fsck_all.sh-
Run it as root:
./force_fsck_all.sh🔒 Why /etc/fstab is not modified
This version:
- Does not touch or modify
/etc/fstabat all - Assumes that your current
/etc/fstabis correctly set (which it is)
That way, nothing will break, and the root fs stays set to 1, exactly as Proxmox originally configured it.
Ins0mniA
TimeZone Date Time for Debian and Ubuntu.
🛠️ System Maintenance & Timezone Setup Script
A production-ready, interactive Bash script for Debian 10–13 and Ubuntu 18–24 that automates system updates, timezone configuration, and NTP time synchronization — all wrapped in a clean, colorized terminal interface with full logging and error handling.
✨ Features
- 🎨 Beautiful TUI — Colorized output with spinners, progress bars, and ASCII-bordered sections
- 🔍 Auto OS Detection — Detects Debian 10–13 and Ubuntu 18–24 automatically; exits gracefully on unsupported systems
- 🔐 Smart Privilege Handling — Works as
rootor detectssudoavailability automatically - 📦 System Update — Shows full list of upgradable packages (
name → new_version), runsupgrade,dist-upgrade,autoremove,autocleanwith live progress - 🌍 Timezone Configuration — Interactive menu with common zones, custom input, and full Debian-specific handling
- 🕐 NTP Synchronization — Enables and verifies
systemd-timesyncdwith real-time sync confirmation - 📝 Full Logging — Every action logged to
/var/log/system-maintenance.logwith timestamps - 💾 Config Backups — Automatically backs up
/etc/timezoneand/etc/localtimebefore any changes - 🔁 Reboot Prompt — Detects kernel updates and prompts for reboot if needed
- 🛡️ Error Handling — Uses
set -euo pipefail+trap ERRfor bulletproof execution
📋 Requirements
| Requirement | Notes |
|---|---|
| Bash 4.0+ | Pre-installed on all target distros |
| systemd | Required (all target distros use it) |
| apt | Debian/Ubuntu package manager |
| sudo or root | For system-level changes |
Missing dependencies (
lsb-release,pv,systemd-timesyncd) are automatically installed by the script.
🚀 Usage
🚀 One-Line Download & Execute :
apt update && apt install -y curl && clear && \
curl -s https://docs.greenhome.stream/attachments/72 -o /tmp/timezone-setup.sh && \
bash /tmp/timezone-setup.sh
OR
1. Download and make executable
chmod +x system-maintenance.sh2. Run as root or with sudo
# As root
./system-maintenance.sh

# As a sudo-capable user
sudo ./system-maintenance.sh
🔄 What the Script Does (Step by Step)
Step 1 — Privilege Check
Detects if running as root. If not, verifies sudo access before proceeding.
Step 2 — OS Detection
Reads /etc/os-release or uses lsb_release to identify the distro and version. Exits with a clear error message if the OS is unsupported.
Step 3 — Dependency Check
Silently refreshes the apt cache and installs any missing required packages (lsb-release, pv, systemd-timesyncd).
Step 4 — System Update (optional, prompted)
- Prompts: "Perform full system update? [Y/n]" (defaults to Yes after 30s)
- Displays a formatted list of all upgradable packages with version arrows (
1.2.0 → 1.3.0) - Detects kernel updates and flags for reboot
- Runs with live spinners:
apt upgrade→dist-upgrade→autoremove→autoclean
Step 5 — Timezone Configuration (optional, prompted)
- Shows the current active timezone
- Prompts: "Set timezone? Default: Europe/Athens [Y/n]"
- Presents a menu of 9 common timezones + custom input option
- Validates the chosen timezone against
/usr/share/zoneinfo/ - Backs up existing config before applying changes
- On Debian: additionally updates
/etc/localtimesymlink, writes/etc/timezone, and runsdpkg-reconfigure tzdata - On Ubuntu:
timedatectl set-timezonealone is sufficient - Verifies the applied timezone matches the selection
Step 6 — NTP Synchronization (optional, prompted)
- Prompts: "Enable NTP sync with systemd-timesyncd? [Y/n]"
- Runs
timedatectl set-ntp true - Enables and starts
systemd-timesyncdvia systemctl - Waits up to 15 seconds for sync confirmation with a live progress bar
- Displays service status and full
timedatectl statusoutput
Step 7 — Final Summary
Prints a formatted table with:
- Detected OS and version
- Active timezone
- NTP enabled/synchronized state
- Current date and time
- Log file path
- Reboot prompt if a kernel update was applied
📁 Log File
All actions are recorded in: /var/log/system-maintenance.log If the script lacks write permission to /var/log/, it falls back to: /tmp/system-maintenance.log
Log entries include timestamps and status for every operation performed.
🌍 Supported Timezones (Built-in Menu)
| # | Timezone | Offset |
|---|---|---|
| 1 | Europe/Athens (default) | UTC+2/+3 |
| 2 | Europe/London | UTC+0/+1 |
| 3 | Europe/Berlin | UTC+1/+2 |
| 4 | Europe/Paris | UTC+1/+2 |
| 5 | America/New_York | UTC-5/-4 |
| 6 | America/Chicago | UTC-6/-5 |
| 7 | America/Denver | UTC-7/-6 |
| 8 | America/Los_Angeles | UTC-8/-7 |
| 9 | UTC | UTC+0 |
| 0 | Custom | Manual input |
🐧 Compatibility Matrix
| OS | Versions | Tested |
|---|---|---|
| Debian | 10 (Buster), 11 (Bullseye), 12 (Bookworm), 13 (Trixie) | ✅ |
| Ubuntu | 18.04, 20.04, 22.04, 24.04 | ✅ |
| Other | Any non-Debian/Ubuntu | ❌ Exits gracefully |
⚠️ Notes
- The script is idempotent — safe to run multiple times without side effects
- Config files are backed up with a timestamp suffix before any modification
- All prompts have a 30-second timeout that defaults to the safe/recommended option
systemd-timesyncdandchronyshould not run simultaneously; this script only managestimesyncd
Install Qemu-guest-agent on Debian / Ubuntu
QEMU Guest Agent Installation Script
🇬🇧 English
📌 Overview
This script automates the installation and configuration of the qemu-guest-agent service on Debian/Ubuntu-based systems.
It is designed to be:
- Simple
- Clean
- Informative
- Safe to run multiple times (idempotent behavior)
⚙️ What the Script Does
- Clears the terminal for better readability
- Displays a visual banner
- Updates package lists (
apt update) - Upgrades installed packages (
apt upgrade -y) - Checks if
qemu-guest-agentis already installed- If installed → Skips installation
- If not → Installs it
- Checks if the service is running
- If running → Skips
- If not → Starts the service
- Checks if the service is enabled at boot
- If enabled → Skips
- If not → Enables it
- Verifies the final service status
- Displays a clear summary of all actions performed
🎨 Output Features
- 🟠 Orange → Processing steps
- 🟢 Green → Successful actions
- 🔴 Red → Failed actions
Each step is verified and reports its real status.
▶️ Usage
Option 1 – One-liner (quick run)
apt update && apt install -y curl && clear && curl -s https://docs.greenhome.stream/attachments/73 | bashOption 2 – Manual (safer)
curl -s -o install.sh https://docs.greenhome.stream/attachments/73
chmod +x install.sh
sudo ./install.sh
⚠️ Requirements
- Debian / Ubuntu-based system
- Internet connection
- Root privileges (use
sudo)
🧾 Final Output
At the end, the script shows a summary like:
Package Status  : INSTALLED NOW / ALREADY INSTALLED
Service Status  : STARTED NOW / ALREADY RUNNING
Enable Status   : ENABLED NOW / ALREADY ENABLED
Final State     : RUNNING / NOT RUNNING
🇬🇷 Ελληνικά
📌 Περιγραφή
Αυτό το script αυτοματοποιεί την εγκατάσταση και ρύθμιση της υπηρεσίας qemu-guest-agent σε συστήματα Debian/Ubuntu.
Είναι σχεδιασμένο να είναι:
- Απλό
- Καθαρό
- Κατανοητό
- Ασφαλές για επαναλαμβανόμενη εκτέλεση
⚙️ Τι κάνει το Script
-
Καθαρίζει την οθόνη (clear)
-
Εμφανίζει banner τίτλου
-
Ενημερώνει τα πακέτα (
apt update) -
Αναβαθμίζει το σύστημα (
apt upgrade -y) -
Ελέγχει αν είναι εγκατεστημένο το
qemu-guest-agent- Αν υπάρχει → Το παραλείπει
- Αν όχι → Το εγκαθιστά
-
Ελέγχει αν η υπηρεσία τρέχει
- Αν τρέχει → Το παραλείπει
- Αν όχι → Την εκκινεί
-
Ελέγχει αν είναι ενεργοποιημένη στο boot
- Αν είναι → Το παραλείπει
- Αν όχι → Την ενεργοποιεί
-
Ελέγχει την τελική κατάσταση της υπηρεσίας
-
Εμφανίζει αναλυτική σύνοψη ενεργειών
🎨 Εμφάνιση
- 🟠 Πορτοκαλί → Επεξεργασία
- 🟢 Πράσινο → Επιτυχία
- 🔴 Κόκκινο → Αποτυχία
Κάθε βήμα επαληθεύεται και εμφανίζει πραγματικό αποτέλεσμα.
▶️ Χρήση
Επιλογή 1 – Γρήγορη εκτέλεση
apt update && apt install -y curl && clear && curl -s https://docs.greenhome.stream/attachments/73 | bashΕπιλογή 2 – Χειροκίνητα (πιο ασφαλές)
curl -s -o install.sh https://docs.greenhome.stream/attachments/73
chmod +x install.sh
sudo ./install.sh
⚠️ Απαιτήσεις
- Σύστημα Debian / Ubuntu
- Σύνδεση στο internet
- Δικαιώματα root (
sudo)
🧾 Τελική Σύνοψη
Στο τέλος εμφανίζεται:
Package Status  : INSTALLED NOW / ALREADY INSTALLED
Service Status  : STARTED NOW / ALREADY RUNNING
Enable Status   : ENABLED NOW / ALREADY ENABLED
Final State     : RUNNING / NOT RUNNING