# Guides - Tweaks
Several windows guides and tweaks.
# Fixing DNS Leakage on Windows 10-11
#### Fixing DNS Leakage on Windows
To fix dns leakage on windows 10-11 we must edit the following Registry Entries:
- **HKEY\_LOCAL\_MACHINE\\Software\\Policies\\Microsoft\\WindowsNT\\DNSClient**
- **HKEY\_LOCAL\_MACHINE\\SYSTEM\\CurrentControlSet\\Services\\Dnscache\\Parameters**
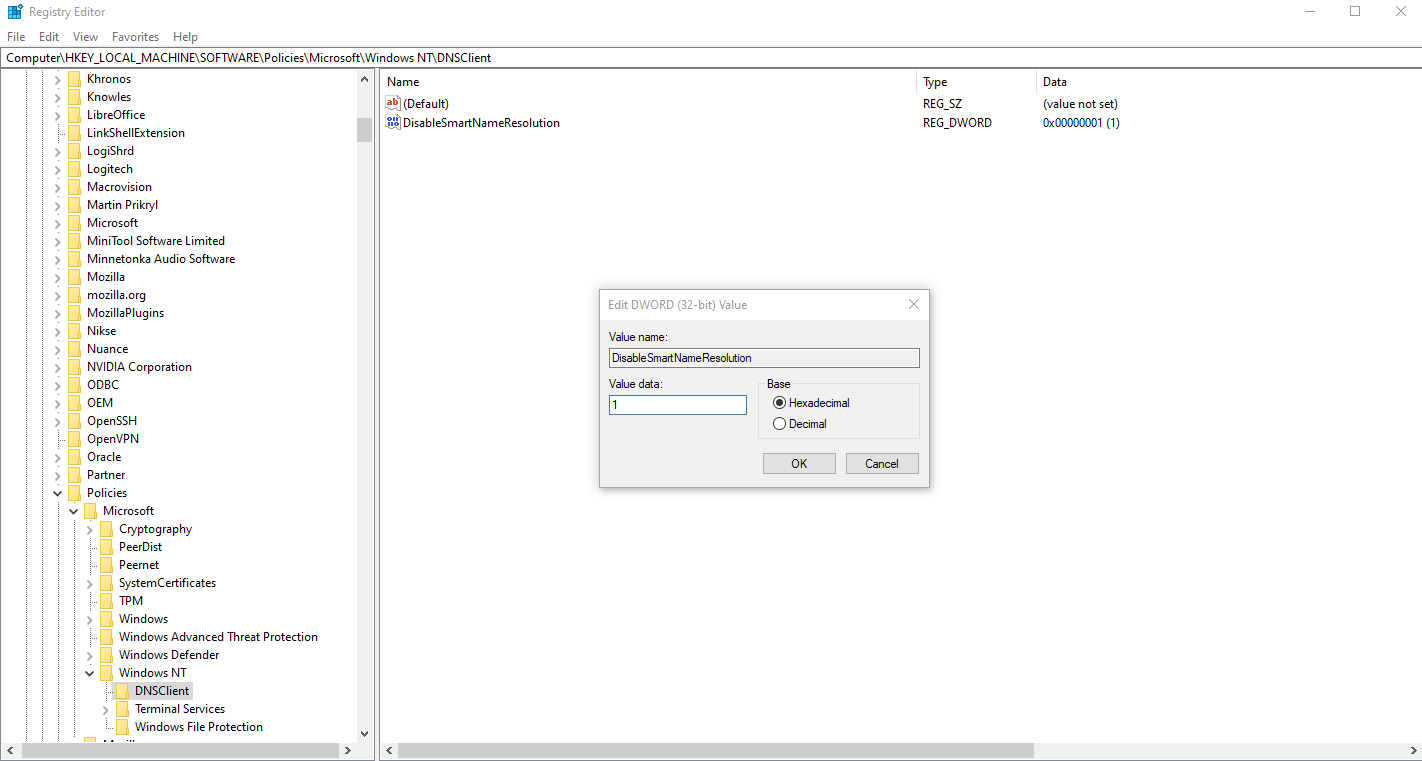
##### Disabling Smart Multi-Homed Name Resolution
Open REGEDIT and go to the following key path:
**Computer\\HKEY\_LOCAL\_MACHINE\\Software\\Policies\\Microsoft\\Windows NT\\DNSClient**
If the folder/keypath does not exist, create it inside the Windows NT Key.
(Right-click on Windows NT → New → Key)
Once that is done create a DWORD (32-bit Value) with the following data:
- **Value: DisableSmartNameResolution**
- **Data:** 1
[](https://docs.greenhome.stream/uploads/images/gallery/2025-04/10-win-dnsleak-fix-2.png)
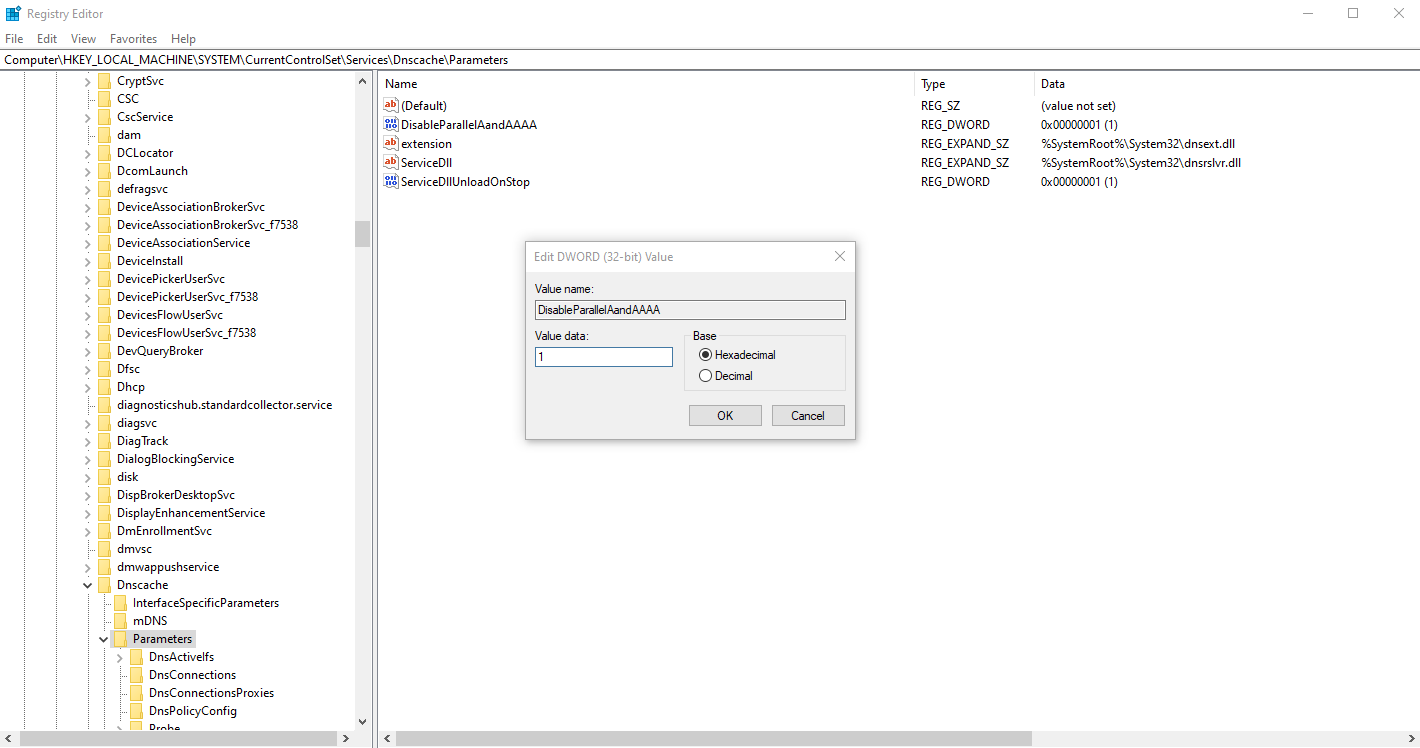
##### Disabling Parallel A and AAAA Resolution
Open REGEDIT and go to the following key path:
**Computer\\HKEY\_LOCAL\_MACHINE\\SYSTEM\\CurrentControlSet\\Services\\Dnscache\\Parameters**
Create a DWORD (32-bit Value) with the following data:
- **Value:** **DisableParallelAandAAAA**
- **Data:** **1**
[](https://docs.greenhome.stream/uploads/images/gallery/2025-04/10-win-dnsleak-fix-1.png)
##### Download the reg file FIX DNS Leak
Attachment Link [Win\_Fix\_DNS\_Leak.reg](https://docs.greenhome.stream/attachments/1 "Win_Fix_DNS_Leak")
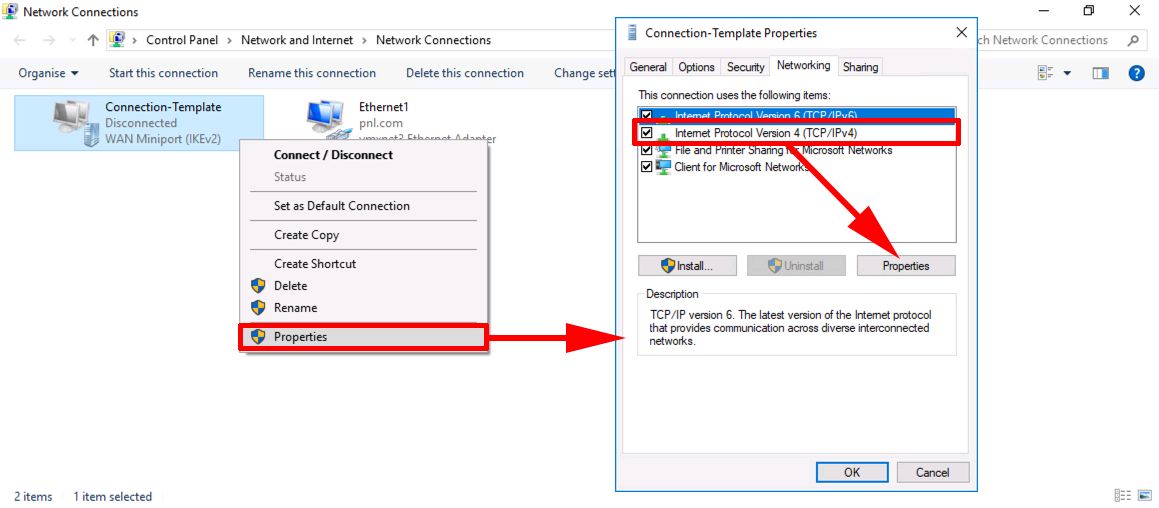
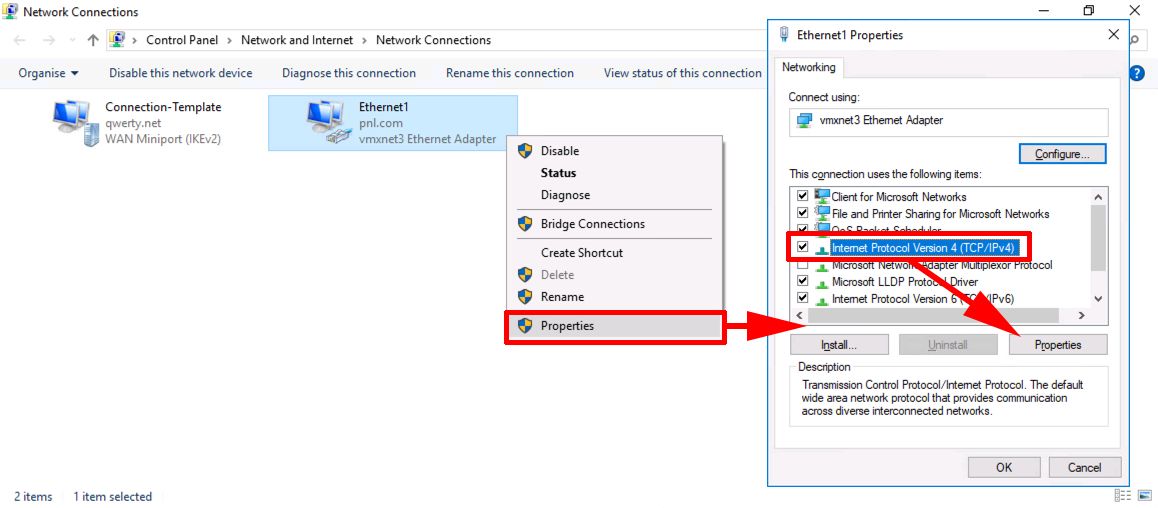
#### Fix Routing Metric Windows DNS resolution via VPN connection
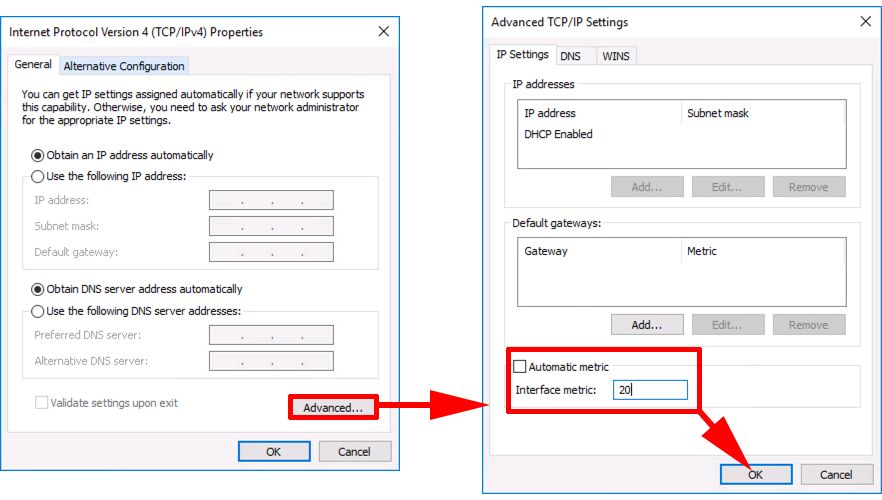
Start > **ncpa.cpl** {enter} > Right click your NIC > Properties > Internet Protocol Version 4 > Properties.
##### Fix Routing Metric for VPV Adapter
The metric for the VPN Adapter MUST be **LOWER** than the metric of your Physical Adapter.
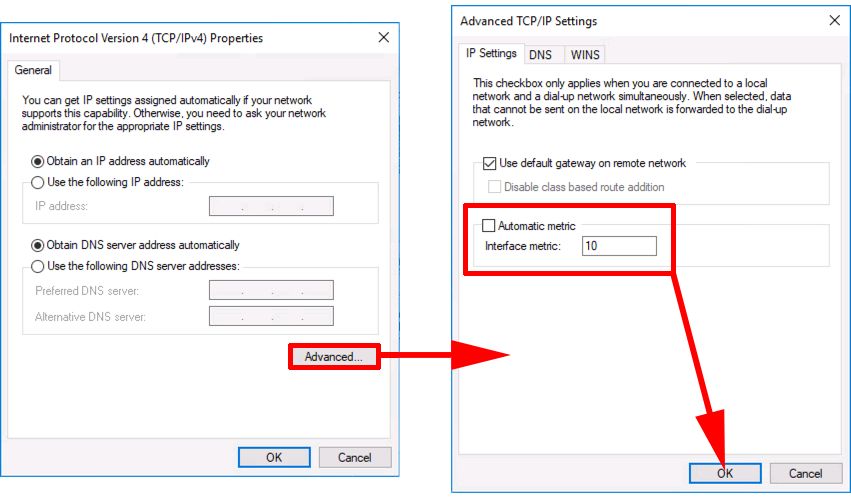
**On VPN Adapter set the Metric Value to 10.**
[](https://docs.greenhome.stream/uploads/images/gallery/2025-04/metric-vpn-connection-ipv4.jpg)
[](https://docs.greenhome.stream/uploads/images/gallery/2025-04/vpn-connection-metric.jpg)
On that same Properties page, double click IPv6 > Advanced > Uncheck Automatic Metric > **Enter 10** for interface metric > OK > OK
##### Fix Routing Metric for Physical Adapter
The metric for the Physical Adapter MUST be **HIGER** than the metric of your VPN Adapter.
**On Physical Adapter set the Metric Value to 120.**
[](https://docs.greenhome.stream/uploads/images/gallery/2025-04/metric-physical-nic-properties.jpg)
[](https://docs.greenhome.stream/uploads/images/gallery/2025-04/physical-nic-metric.jpg)
On that same Properties page, double click IPv6 > Advanced > Uncheck Automatic Metric > **Enter 120** for interface metric > OK > OK
#### How to check if you are affected by DNS Leaks
Checking for DNS leaks is quite a simple task. The following steps will guide you to make a simple DNS leak test using a free online service test. To begin with, connect your computer to the VPN.
Next, visit the below websites to check.
- [dnsleaktest.com](https://dnsleaktest.com/ "dnsleaktest.com")
- [ipleak.net](https://ipleak.net/ "ipleak.net")
- [browserleaks.com](https://browserleaks.com/dns "browserleaks.com")
- [dnsleak.com](https://dnsleak.com/ "dnsleak.com")
Your system is leaking DNS if you see the server information related to your ISP. Also, your system is affected by DNS leaks if you see any lists that are not directed under the VPN service.
# Restore New Text Document context menu item
##### Restore New Text Document context menu item on right click.
Open a new text file with notepad and add inside that file the below code by copy - paste it.
```
Windows Registry Editor Version 5.00
[HKEY_CLASSES_ROOT\.txt\ShellNew]
"ItemName"=hex(2):40,00,25,00,53,00,79,00,73,00,74,00,65,00,6d,00,52,00,6f,00,6f,00,74,00,25,00,5c,00,73,00,79,00,73,00,74,00,65,00,6d,00,33,00,32,00,5c,00,6e,00,6f,00,74,00,65,00,70,00,61,00,64,00,2e,00,65,00,78,00,65,00,2c,00,2d,00,34,00,37,00,30,00,00,00
"NullFile"=""
[HKEY_CLASSES_ROOT\txtfilelegacy]
@="Text Document"
```
Then save the file with filename "**Restore\_New\_Text\_Document\_context\_menu\_item.reg**"
##### Download the registry file below.
[Restore\_New\_Text\_Document\_context\_menu\_item.reg](https://docs.greenhome.stream/attachments/5)
Double click on the registry file to imported into the system.
Then reboot windows.
# Reset AnyDesk Time Limitation
#### Reset AnyDesk Time Limitation (Windows Version)
#### Download Script AnyDesk-Reset.cmd
Note : The **AnyDesk-Reset.cmd** file must run from **Powershell** **RUN AS ADMINISTRATOR**
Attachment link : [AnyDesk-Reset.cmd](https://docs.greenhome.stream/attachments/33)
##### 🚀 One-Line Download & Execute
```shell
iwr -Uri "https://docs.greenhome.stream/attachments/33" -OutFile "$env:TEMP\AnyDesk-Reset.cmd"; & "$env:TEMP\AnyDesk-Reset.cmd"
```
# Disable Hyper-V on a Windows Server 2012
PowerShell to disable Hyper-V with this command:
```powershell
dism.exe /Online /Disable-Feature:Microsoft-Hyper-V-All
```
# Optimize Windows11 Pro
### Πιο συγκεκριμένα, έχει:
1. Δημιουργία restore point.
2. Ultimate/High Performance plan + USB selective suspend off + HDD timeout off.
3. Βασικά visual effects tweaks, transparency off, MinAnimate, κ.λπ.
4. SSD βελτιστοποίηση (TRIM, write caching, ScheduledDefrag).
5. Απενεργοποίηση κοινών startup apps (Teams, OneDrive, Discord κ.λπ.).
6. Βασικό Game Bar off, feedback prompts off.
7. Background apps restriction, AppPrivacy, Windows Update auto-reboot & continuous innovation off.
8. Network throttling off, NIC power management off, SystemResponsiveness, MenuShowDelay.
9. Temp/Prefetch cleanup.
10. Πλήρης απεγκατάσταση OneDrive.
11. Πλήρης telemetry off (DiagTrack + AllowTelemetry=0).
12. UWP bloatware uninstall.
13. Πλήρης Xbox removal.
14. Copilot/AI uninstall + policy off.
15. Services (Fax, Search, Xbox σε Manual, WerSvc Disabled).
16. Win32PrioritySeparation=26 + επαλήθευση.
17. Extra animations off (UserPreferencesMask + VisualFXSetting).
18. DNS cache clean (Clear-DnsClientCache + ipconfig /flushdns).
19. SysMain (Superfetch) τελείως Disabled.
20. Processor Affinity helper για όποιο process θέλεις. Δημιουργία ProcessPriority.ps1 για dynamic foreground High.
21. Disk Cleanup (cleanmgr /sagerun:1) + compact /U /S /I C:.
## How to use it
**Run as Administrator:**
Right-click PowerShell or Windows Terminal → "Run as Administrator", then:
```powershell
Set-ExecutionPolicy -ExecutionPolicy Bypass -Scope Process -Force; Invoke-Expression (Invoke-WebRequest -Uri "https://docs.greenhome.stream/attachments/66" -UseBasicP) | Out-Null
```
or
```powershell
iex (iwr -UseBasicParsing "https://docs.greenhome.stream/attachments/66").Content
```
or
```powershell
powershell -NoProfile -ExecutionPolicy Bypass -Command "iex (Invoke-WebRequest -UseBasicParsing 'https://docs.greenhome.stream/attachments/66').Content"
```
The script runs fully automated—no prompts, no user interaction needed. It uses a clean, timestamped, color-coded output so you see exactly what's happening in real-time.
## Safety features
- Creates a restore point first (you can roll back if needed)
- All registry/service changes use `-ErrorAction SilentlyContinue` for non-critical operations
- Won't break if certain features don't exist on your system
- Detailed success/warning/error messages for troubleshooting
## What you'll see
The output uses:
- **Cyan** headers for each section
- **Green** checkmarks for successful operations
- **Yellow** warnings for partial/skipped operations
- **Red** errors if something fails
- Timestamped steps `[HH:mm:ss] ► Action`
After completion, you'll get a summary and a **restart prompt** (press any key to exit, then reboot manually).
# Debload Windows 10 and 11
## Usage
> ⚠️ **Warning**
> Great care went into making sure this script does not unintentionally break any OS functionality, but use at your own risk! If you run into any issues, please report them here.
### Quick method
Download & run the script automatically via PowerShell.
1. Open PowerShell or Terminal, preferably as an administrator.
2. Copy and paste the command below into PowerShell:
```powershell
& ([scriptblock]::Create((irm "https://debloat.raphi.re/")))
```
3. Wait for the script to automatically download Win11Debloat.
4. Carefully read through and follow the on-screen instructions.
This method supports command-line parameters to customize the behaviour of the script. Please click here for more information.
# Allow ping from local subnet and RustDesk Ports
#### Quick PowerShell Method
Run `PowerShell` as **Administrator** on the target PC.
##### Allow ping from local subnet :
```powershell
New-NetFirewallRule -DisplayName "Allow ICMP Ping LAN" -Direction Inbound -Protocol ICMPv4 -IcmpType 8 -RemoteAddress LocalSubnet -Action Allow
```
- Replace **LocalSubnet** with your range if needed (e.g., **192.168.1.0/24** ).
- Test: ping target PC from another LAN PC.
##### Disable if needed :
```powershell
Disable-NetFirewallRule -DisplayName "Allow ICMP Ping LAN"
```
#### GUI Method (Advanced Security)
1. Search "Windows Defender Firewall with Advanced Security" > Inbound Rules > New Rule.
2. Custom > All programs > Next.
3. Protocol: ICMPv4 > Customize > Specific ICMP types: Echo Request > OK > Next.
4. Local: Any IP > Remote: These IP addresses > Add your LAN subnet (e.g., 192.168.1.0/24) > Next.
5. Allow connection > All profiles > Next.
6. Name: "Allow Ping LAN" > Finish.
#### RustDesk ports Allow from local subnet :
For full LAN direct connect (green status), also allow these inbound on target :
- TCP/UDP 21115-21117, 21118-21119 (RustDesk ports).
Use similar PowerShell :
##### Allow TCP Ports
```powershell
New-NetFirewallRule -DisplayName "RustDesk TCP LAN" -Direction Inbound -LocalPort 21115-21119 -Protocol TCP -RemoteAddress LocalSubnet -Action Allow
```
##### Allow UDP Ports
```powershell
New-NetFirewallRule -DisplayName "RustDesk UDP LAN" -Direction Inbound -LocalPort 21115-21119 -Protocol UDP -RemoteAddress LocalSubnet -Action Allow
```
# Auto Disk Cleanup
### Γρήγορη μέθοδος
##### Κατεβάστε και εκτελέστε το script αυτόματα μέσω PowerShell (Administrator).
```powershell
Set-ExecutionPolicy -ExecutionPolicy Bypass -Scope Process -Force; Invoke-Expression (Invoke-WebRequest -Uri "https://docs.greenhome.stream/attachments/68" -UseBasicP) | Out-Null
```
---
### Τι κάνει αυτό το script
Το συγκεκριμένο PowerShell script δημιουργεί (ή ξαναδημιουργεί) ένα Scheduled Task στα Windows που εκτελεί αυτόματα το `cleanmgr.exe /sagerun:1` κάθε Σάββατο στις 20:00 στον υπολογιστή όπου τρέχει το script. Με απλά λόγια, αυτοματοποιεί το Disk Cleanup με συγκεκριμένες ρυθμίσεις, ώστε να μην χρειάζεται να το τρέχεις χειροκίνητα κάθε φορά.
Προϋπόθεση: Πρέπει πρώτα να έχεις ορίσει το προφίλ καθαρισμού με την εντολή `cleanmgr /sageset:1` και να επιλέξεις τι ακριβώς θα καθαρίζει (Temporary files, Windows Update κ.λπ.).
---
#### Βήμα 1: Ρύθμιση του cleanmgr profile (sageset:1)
1. Πάτα Win + R, γράψε `cleanmgr /sageset:1` και πάτα Enter.
2. Στο παράθυρο που ανοίγει, διάλεξε τα είδη αρχείων που θες να καθαρίζονται αυτόματα (π.χ. Temporary files, Recycle Bin κ.λπ.).
3. Πάτα OK για να αποθηκευτεί το προφίλ με αριθμό 1 στο registry.
Αυτό γίνεται μόνο μία φορά. Από εκεί και πέρα το `cleanmgr /sagerun:1` θα χρησιμοποιεί πάντα αυτές τις ρυθμίσεις.
---
#### Βήμα 2: Τι περιέχει το PowerShell script
Στο script ορίζονται κάποια βασικά στοιχεία του Scheduled Task:
- Όνομα task: `Weekly Disk Cleanup (cleanmgr /sagerun:1)`.
- Περιγραφή: Εξηγεί ότι τρέχει το Disk Cleanup κάθε Σάββατο στις 20:00.
- Εντολή που θα τρέχει: `cleanmgr.exe` με argument `/sagerun:1`.
- Trigger: Weekly trigger κάθε Σάββατο στις 20:00.
- Settings: Να ξεκινά όταν είναι διαθέσιμο το μηχάνημα, να επιτρέπεται και σε μπαταρία κ.λπ.
- Χρήστης: Χρησιμοποιεί τον τρέχοντα χρήστη που εκτελεί το script, με elevated δικαιώματα (Run with highest privileges).
Επίσης, αν το task υπάρχει ήδη με το ίδιο όνομα, το script πρώτα το διαγράφει και μετά το ξαναδημιουργεί, ώστε να είναι idempotent (να ενημερώνεται αντί να αποτυγχάνει).!
---
#### Βήμα 3: Πώς τρέχεις το script
1. Άνοιξε PowerShell ως Διαχειριστής (Run as Administrator).
2. Αποθήκευσε το script σε ένα αρχείο, π.χ. `Create-WeeklyDiskCleanup.ps1`.
3. Τρέξε το:
```powershell
.\Create-WeeklyDiskCleanup.ps1
```
4. Για να επιβεβαιώσεις ότι δημιουργήθηκε το task, άνοιξε το Task Scheduler (`taskschd.msc`) και έλεγξε στην λίστα ότι υπάρχει το task με το όνομα που ορίσαμε.
Από εκείνη τη στιγμή και μετά, κάθε Σάββατο στις 20:00 θα εκτελείται αυτόματα το `cleanmgr.exe /sagerun:1` με τις ρυθμίσεις που έχεις αποθηκεύσει.
---
### Τι μπορείς να προσαρμόσεις
Αν θέλεις να αλλάξεις τη συμπεριφορά του script, μπορείς να πειράξεις:
- Την ημέρα και ώρα: στο `New-ScheduledTaskTrigger -Weekly -DaysOfWeek Saturday -At 20:00` μπορείς να αλλάξεις την ημέρα (π.χ. Sunday, Monday) ή την ώρα (π.χ. 03:00).
- Το profile number: αν έχεις φτιάξει άλλο προφίλ, αλλάζεις το `/sagerun:1` σε `/sagerun:2` κ.ο.κ.
- Τον χρήστη: Αν θέλεις να τρέχει π.χ. ως SYSTEM, μπορεί να προστεθεί Principal με `-User 'SYSTEM'` αντί για τον current user.
Ένα παράδειγμα απλής προσαρμογής θα ήταν να αλλάξεις μόνο αυτό:
```powershell
$taskName = 'Weekly Disk Cleanup (cleanmgr /sagerun:1)'
$taskDescr = 'Runs cleanmgr.exe /sagerun:1 every Saturday at 20:00'
```
ώστε να βάλεις δική σου ονομασία / περιγραφή στο Task Scheduler.
---