# Amnisia VPN

Instructions for self-host, setup, configure and tweak a VPN server

# Amnezia VPN Client setup guide.

#### Downloading Amnezia VPN Client  


Go to the below link and download the version for your OS your running.

[https://amnezia.org/en/downloads](https://amnezia.org/en/downloads)

##### Android App

[https://play.google.com/store/apps/details?id=org.amnezia.vpn](https://play.google.com/store/apps/details?id=org.amnezia.vpn)

##### iOS App

[https://apps.apple.com/us/app/amneziavpn/id1600529900](https://apps.apple.com/us/app/amneziavpn/id1600529900 "iOS App")

#### Setup client VPN key

After you download and install the app, open it and you will see the below screen.

[![amnezia.jpg](https://docs.greenhome.stream/uploads/images/gallery/2025-04/scaled-1680-/amnezia.jpg)
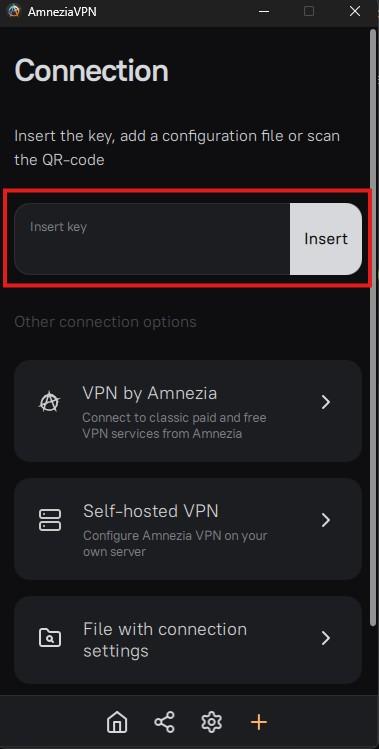
](https://docs.greenhome.stream/uploads/images/gallery/2025-04/amnezia.jpg)

At that FIELD inside the RED spuare you will COPY - PASTE the KEY that youhave receive from your VPN provider.  
***<span style="color:rgb(224,62,45);">The below is a KEY example, </span><span style="color:rgb(224,62,45);">you should copy ALL THE TEXT of the key that you receive.</span>***

```
vpn://AASOVI5k1rEiqnMw6VeQ0zuUb6JAGH33VxjSt7qUO2rSB1wbq26VSrc3acwIo47KQAEvbeN_37koYJZ96KqJH-ec-W7zMfNVqZKP4IU4BQjDKxRBMF6He6gP0FRQs5gK7OaEPgcZcSsTXJAVw9QkQ5dUoVaiUZhG1U3ZMBRVKtWoVKObjbok1xuNUolGJYqsaXLdrEulbnoe05RSAdizGOULA4RZlqWsI_PsSjlWnVHKrUGSTkiHZ4i2T_hyMYVd0jWXPLuFvrlCLSOVI5k1rEiqnMw6VeQ0zuUtKpA970gWMdKSo7szKenFMYUi7Min0EXwmKxRBMF6He6gP0FRQtkxxzkniex7lXvmeLNJIY68ZZ68NYI47fo8yPYliELNMfDj5Y1pK6urgTGfDrdxp3Xr18F09rTcJ84obdxJ0nUhHe6EZHMqSqyLsqj9rYhitJ2s4AfXzQJzZ6yt1pO0XHadV3kXP-LL9-FI66iyiVuoH9e94Pky7L4kWbaa5q_9NnE0OdzHu4hTGM-DBN9fFlu_HMEmq19VTNVeqQvD2wCHYhT3q3lmjlwl5rFUvnJufw0H7-ExENikTpLAPP4j2W1W6uOeRNTQSHRIWntlgT2yd2o5MLZNaCrEMat1SrDDrBKFcYcAJorJ1p6kmgEYj5aPsYvIb2xDGtAH2ZrpGHi-h2w5l1W9Il5anBJ0IbKyRadsj2xq2A6nrByiVuoH9e94PkmtWPkwWIIY-X_04f4_uF-999Ny37ha_5Id9K2i9eM6w9bzsP_k73_rchEvg7V4lutris921afOzYa5V2fy6-Ab7UYhwSsi6KioK2ZuGIcqK1lR1XdVpeHLUoiQlM9KHMAJrtIW0UEoVtn4RJukABJBv_rmrgixIN6fDwjQKeJQFIUMIowkLczwA9KIujFMKs-RyNFnls_ut_uSeExhvYXz-Gnxro8hZcHBx2alKk6bHyiVuoH9e94PkMA2pduNHwpnwcL4uvwepGgQYfiLwg157mexQSOVI5k1rEiqnMw6VeQ0zuULFKEpRyK4XK8AoQSBjccLvT1MRlYbI_nStwPKbk03Z6WrNRoNS54MhVA6VPz-HBNg
```

After you insert your key you will see a screen like the below and just press CONNECT to make your VPN connection.

[![image.png](https://docs.greenhome.stream/uploads/images/gallery/2025-04/scaled-1680-/image.png)](https://docs.greenhome.stream/uploads/images/gallery/2025-04/image.png)

You are ready to go.

<span style="color:rgb(224,62,45);">**Ins0mniA**</span>

<div class="notranslate" id="bkmrk--2"></div>

# Useful scripts for VPS VPN Servers

Below there are some useful script that you can run to your Linux VPS or VPN or what ever Linux machine or server you have.

##### Unattended Upgrades Debian - Ubuntu

To install these packages, run the following command as root:

```bash
apt-get install -y unattended-upgrades apt-listchanges
```

more information at page [Unattended Upgrades Debian - Ubuntu](https://docs.greenhome.stream/books/tutorials/page/unattended-upgrades-debian-ubuntu "Unattended Upgrades Debian - Ubuntu")

##### Auto Update - Upgrade a Linux machine

The below script is to auto update - upgrade - remove - clean a Linux machine or Server.

Attachment Link [**os-update.sh**](https://docs.greenhome.stream/attachments/3 "os-update.sh")

more information at page [Auto Update - Upgrade a Linux machine](https://docs.greenhome.stream/books/scripts/page/auto-update-upgrade-a-linux-machine "Auto Update - Upgrade a Linux machine")

##### Empty ALL LOGs

The below script scan all files with extension .log then empty all log files.

Attachment Link [**empty\_log\_files.sh**](https://docs.greenhome.stream/attachments/2 "empty_log_files.sh")

more information at page [Empty ALL LOGs on a Linux Server](https://docs.greenhome.stream/books/scripts/page/empty-all-logs-on-a-linux-server "Empty ALL LOGs on a Linux Server")

<span style="color:rgb(224,62,45);">**Ins0mniA**</span>

# Amnezia VPN Server settings

#### Download and update adblocker list for dnscrypt proxy

##### Creating the script

Open the terminal and type the below command :

```bash
nano update-adblocker.sh
```

and then copy / paste the below code inside the file "update-adblocker.sh"

```bash
#!/bin/bash
# Name: update-adblocker.sh
# Purpose: Download and update adblocker list for dnscrypt proxy
# Usage: Call it from the CLI or cron job https://www.cyberciti.biz/faq/how-do-i-add-jobs-to-cron-under-linux-or-unix-oses/
DEST="/etc/dnscrypt-proxy/blocked_names.txt"
#
# Blocks both adware + malware
# See for other lists https://github.com/StevenBlack/hosts
#SRC="https://raw.githubusercontent.com/StevenBlack/hosts/master/alternates/gambling-porn/hosts" Hosts 224.828
#SRC="https://hosts.ubuntu101.co.za/hosts" Hosts 698.866
#SRC="https://download.dnscrypt.info/blacklists/domains/mybase.txt" Hosts 465.625
SRC="https://hosts.ubuntu101.co.za/hosts"
TMP_B_FILE="$(mktemp)"
TMP_B_FILE_SORTED="$(mktemp)"
wget --timeout=10 --tries=5 -qO- "${SRC}" | grep -Ev "(localhost)" | grep -Ev "#" | sed -E "s/(0.0.0.0 |127.0.0.1 |255.255.255.255 )//" >> "${TMP_B_FILE}"
awk '/^[^#]/ { print $1 }' "${TMP_B_FILE}" | sort -u > "${TMP_B_FILE_SORTED}"
cp -f "${TMP_B_FILE_SORTED}" "$DEST"
rm -f "${TMP_B_FILE}" "${TMP_B_FILE_SORTED}"
sleep 5
systemctl restart dnscrypt-proxy.service

```

<span style="color:rgb(170,170,170);font-family:'-apple-system', BlinkMacSystemFont, 'Segoe UI', Oxygen, Ubuntu, Roboto, Cantarell, 'Fira Sans', 'Droid Sans', 'Helvetica Neue', sans-serif;font-size:14px;font-style:normal;font-weight:400;letter-spacing:normal;text-indent:0px;text-transform:none;word-spacing:0px;white-space:normal;background-color:rgb(34,34,34);text-decoration-thickness:initial;text-decoration-style:initial;text-decoration-color:initial;display:inline;float:none;">then press </span><span style="margin:0px;padding:0px;border:0px;font-style:normal;font-weight:400;font-size:14px;line-height:inherit;font-family:'-apple-system', BlinkMacSystemFont, 'Segoe UI', Oxygen, Ubuntu, Roboto, Cantarell, 'Fira Sans', 'Droid Sans', 'Helvetica Neue', sans-serif;vertical-align:baseline;letter-spacing:normal;text-indent:0px;text-transform:none;word-spacing:0px;white-space:normal;background-color:rgb(34,34,34);text-decoration-thickness:initial;text-decoration-style:initial;text-decoration-color:initial;color:rgb(224,62,45);">**Ctrl + x**</span><span style="color:rgb(170,170,170);font-family:'-apple-system', BlinkMacSystemFont, 'Segoe UI', Oxygen, Ubuntu, Roboto, Cantarell, 'Fira Sans', 'Droid Sans', 'Helvetica Neue', sans-serif;font-size:14px;font-style:normal;font-weight:400;letter-spacing:normal;text-indent:0px;text-transform:none;word-spacing:0px;white-space:normal;background-color:rgb(34,34,34);text-decoration-thickness:initial;text-decoration-style:initial;text-decoration-color:initial;display:inline;float:none;"> it will prompt you \[ </span>`<strong style="margin:0px;padding:0px;border:0px;font-style:inherit;font-variant:inherit;font-weight:bold;font-size:inherit;line-height:inherit;font-family:inherit;vertical-align:baseline;">Save modified buffer?</strong>`<span style="color:rgb(170,170,170);font-family:'-apple-system', BlinkMacSystemFont, 'Segoe UI', Oxygen, Ubuntu, Roboto, Cantarell, 'Fira Sans', 'Droid Sans', 'Helvetica Neue', sans-serif;font-size:14px;font-style:normal;font-weight:400;letter-spacing:normal;text-indent:0px;text-transform:none;word-spacing:0px;white-space:normal;background-color:rgb(34,34,34);text-decoration-thickness:initial;text-decoration-style:initial;text-decoration-color:initial;display:inline;float:none;"> \] press </span><span style="margin:0px;padding:0px;border:0px;font-style:normal;font-weight:400;font-size:14px;line-height:inherit;font-family:'-apple-system', BlinkMacSystemFont, 'Segoe UI', Oxygen, Ubuntu, Roboto, Cantarell, 'Fira Sans', 'Droid Sans', 'Helvetica Neue', sans-serif;vertical-align:baseline;letter-spacing:normal;text-indent:0px;text-transform:none;word-spacing:0px;white-space:normal;background-color:rgb(34,34,34);text-decoration-thickness:initial;text-decoration-style:initial;text-decoration-color:initial;color:rgb(224,62,45);">**y**</span><span style="color:rgb(170,170,170);font-family:'-apple-system', BlinkMacSystemFont, 'Segoe UI', Oxygen, Ubuntu, Roboto, Cantarell, 'Fira Sans', 'Droid Sans', 'Helvetica Neue', sans-serif;font-size:14px;font-style:normal;font-weight:400;letter-spacing:normal;text-indent:0px;text-transform:none;word-spacing:0px;white-space:normal;background-color:rgb(34,34,34);text-decoration-thickness:initial;text-decoration-style:initial;text-decoration-color:initial;display:inline;float:none;"> and </span>**<span style="margin:0px;padding:0px;border:0px;font:inherit;vertical-align:baseline;color:rgb(224,62,45);">enter</span>**

##### Make the script executable

After that you need to make the script executable, so you will write the below command :

```bash
chmod +x update-adblocker.sh
```

##### Add the script to cron job to run automatically

To run the script daily follow the below steps, you can change according to your need.

```bash
crontab -e
```

<span style="color:rgb(170,170,170);font-family:'-apple-system', BlinkMacSystemFont, 'Segoe UI', Oxygen, Ubuntu, Roboto, Cantarell, 'Fira Sans', 'Droid Sans', 'Helvetica Neue', sans-serif;font-size:14px;font-style:normal;font-weight:400;letter-spacing:normal;text-indent:0px;text-transform:none;word-spacing:0px;white-space:normal;background-color:rgb(34,34,34);text-decoration-thickness:initial;text-decoration-style:initial;text-decoration-color:initial;display:inline;float:none;">then go at the end of the file and add the below line, change the </span>`<span style="margin:0px;padding:0px;border:0px;font:inherit;vertical-align:baseline;color:rgb(224,62,45);"><strong style="margin:0px;padding:0px;border:0px;font-style:inherit;font-variant:inherit;font-weight:bold;font-size:inherit;line-height:inherit;font-family:inherit;vertical-align:baseline;">your_path</strong></span>`<span style="color:rgb(170,170,170);font-family:'-apple-system', BlinkMacSystemFont, 'Segoe UI', Oxygen, Ubuntu, Roboto, Cantarell, 'Fira Sans', 'Droid Sans', 'Helvetica Neue', sans-serif;font-size:14px;font-style:normal;font-weight:400;letter-spacing:normal;text-indent:0px;text-transform:none;word-spacing:0px;white-space:normal;background-color:rgb(34,34,34);text-decoration-thickness:initial;text-decoration-style:initial;text-decoration-color:initial;display:inline;float:none;"> with your folder where the script is locate.</span>

```bash
@daily /your_path/update-adblocker.sh
```

then press <span style="margin:0px;padding:0px;border:0px;font:inherit;vertical-align:baseline;color:rgb(224,62,45);">**Ctrl + x**</span> it will prompt you \[ `<strong style="margin:0px;padding:0px;border:0px;font-style:inherit;font-variant:inherit;font-weight:bold;font-size:inherit;line-height:inherit;font-family:inherit;vertical-align:baseline;">Save modified buffer?</strong>` \] press <span style="margin:0px;padding:0px;border:0px;font:inherit;vertical-align:baseline;color:rgb(224,62,45);">**y**</span> and **<span style="margin:0px;padding:0px;border:0px;font:inherit;vertical-align:baseline;color:rgb(224,62,45);">enter</span>**

**You are done the script in the location `/your_path/os-update.sh` it will automatically run daily.**

##### Download the script update-adblocker.sh  


<span style="margin:0px;padding:0px;border:0px;font-style:inherit;font-variant:inherit;font-size:inherit;line-height:inherit;font-family:inherit;vertical-align:baseline;">Attachment Link</span> **[update-adblocker.sh](https://docs.greenhome.stream/attachments/4)**

Below is the settings for the script that it will run daily with cron job to auto update the DNS servers.

<span style="color:rgb(224,62,45);">**Ins0mniA**</span>

# Settings dnscrypt-proxy.toml

This is a working example, copy / paste the below code inside your file **dnscrypt-proxy.toml**

```bash
# Empty listen_addresses to use systemd socket activation
listen_addresses = ['127.0.0.1:53']
#listen_addresses = ['127.0.0.1:53', '172.29.172.1:53', '172.17.0.1:53']
server_names = ['cloudflare']

## Manual ADD
ipv4_servers = true
ipv6_servers = false
dnscrypt_servers = true
doh_servers = true
require_dnssec = false
require_nofilter = true

# Server must not log user queries (declarative)
require_nolog = true
## How long a DNS query will wait for a response, in milliseconds
timeout = 2500
## Keepalive for HTTP (HTTPS, HTTP/2) queries, in seconds
keepalive = 30

#netprobe_timeout = 60

##########################
#        DNS cache        #
###########################
## Enable a DNS cache to reduce latency and outgoing traffic
cache = true
## Cache size
cache_size = 512
## Minimum TTL for cached entries
cache_min_ttl = 600
## Maximum TTL for cached entries
cache_max_ttl = 86400
## Minimum TTL for negatively cached entries
cache_neg_min_ttl = 60
## Maximum TTL for negatively cached entries
cache_neg_max_ttl = 600

[blocked_names]
blocked_names_file = '/etc/dnscrypt-proxy/blocked_names.txt'

#[query_log]
#  file = '/var/log/dnscrypt-proxy/query.log'

#[nx_log]
#  file = '/var/log/dnscrypt-proxy/nx.log'

[sources]
  [sources.'public-resolvers']
  urls = ['https://raw.githubusercontent.com/DNSCrypt/dnscrypt-resolvers/master/v3/public-resolvers.md', 'https://download.dnscrypt.info/resolvers-list/v3/public-resolvers                                    .md']
  minisign_key = 'RWQf6LRCGA9i53mlYecO4IzT51TGPpvWucNSCh1CBM0QTaLn73Y7GFO3'
  cache_file = 'public-resolvers.md'

```

You can change it according to your needs.

<span style="color:rgb(224,62,45);">**Ins0mniA**</span>

# Settings for resolv.conf

Below is the correct setting of the file **resolv.conf** so all the DNS request to resolve through the DNScrypt-proxy.  
The file is locate at the **/etc/resolv.conf** Open the terminal and type the below command :

```bash
nano /etc/resolv.conf
```

Remove EVERYTHING inside that file OR just COMMENT all the lines by adding \[ <span style="color:rgb(224,62,45);">**\#**</span> \] at the beginning of each line.  
Add the line below by copy / paste it inside the file "**resolv.conf**"

```python
nameserver 127.0.0.1
```

**<span style="color:rgb(170,170,170);font-family:'-apple-system', BlinkMacSystemFont, 'Segoe UI', Oxygen, Ubuntu, Roboto, Cantarell, 'Fira Sans', 'Droid Sans', 'Helvetica Neue', sans-serif;font-size:14px;font-style:normal;font-weight:400;letter-spacing:normal;text-indent:0px;text-transform:none;word-spacing:0px;white-space:normal;background-color:rgb(34,34,34);text-decoration-thickness:initial;text-decoration-style:initial;text-decoration-color:initial;display:inline;float:none;">then press </span><span style="margin:0px;padding:0px;border:0px;font-style:normal;font-weight:400;font-size:14px;line-height:inherit;font-family:'-apple-system', BlinkMacSystemFont, 'Segoe UI', Oxygen, Ubuntu, Roboto, Cantarell, 'Fira Sans', 'Droid Sans', 'Helvetica Neue', sans-serif;vertical-align:baseline;letter-spacing:normal;text-indent:0px;text-transform:none;word-spacing:0px;white-space:normal;background-color:rgb(34,34,34);text-decoration-thickness:initial;text-decoration-style:initial;text-decoration-color:initial;color:rgb(224,62,45);">**Ctrl + x**</span><span style="color:rgb(170,170,170);font-family:'-apple-system', BlinkMacSystemFont, 'Segoe UI', Oxygen, Ubuntu, Roboto, Cantarell, 'Fira Sans', 'Droid Sans', 'Helvetica Neue', sans-serif;font-size:14px;font-style:normal;font-weight:400;letter-spacing:normal;text-indent:0px;text-transform:none;word-spacing:0px;white-space:normal;background-color:rgb(34,34,34);text-decoration-thickness:initial;text-decoration-style:initial;text-decoration-color:initial;display:inline;float:none;"> it will prompt you \[ </span>`<strong style="margin:0px;padding:0px;border:0px;font-style:inherit;font-variant:inherit;font-weight:bold;font-size:inherit;line-height:inherit;font-family:inherit;vertical-align:baseline;">Save modified buffer?</strong>`<span style="color:rgb(170,170,170);font-family:'-apple-system', BlinkMacSystemFont, 'Segoe UI', Oxygen, Ubuntu, Roboto, Cantarell, 'Fira Sans', 'Droid Sans', 'Helvetica Neue', sans-serif;font-size:14px;font-style:normal;font-weight:400;letter-spacing:normal;text-indent:0px;text-transform:none;word-spacing:0px;white-space:normal;background-color:rgb(34,34,34);text-decoration-thickness:initial;text-decoration-style:initial;text-decoration-color:initial;display:inline;float:none;"> \] press </span><span style="margin:0px;padding:0px;border:0px;font-style:normal;font-weight:400;font-size:14px;line-height:inherit;font-family:'-apple-system', BlinkMacSystemFont, 'Segoe UI', Oxygen, Ubuntu, Roboto, Cantarell, 'Fira Sans', 'Droid Sans', 'Helvetica Neue', sans-serif;vertical-align:baseline;letter-spacing:normal;text-indent:0px;text-transform:none;word-spacing:0px;white-space:normal;background-color:rgb(34,34,34);text-decoration-thickness:initial;text-decoration-style:initial;text-decoration-color:initial;color:rgb(224,62,45);">**y**</span><span style="color:rgb(170,170,170);font-family:'-apple-system', BlinkMacSystemFont, 'Segoe UI', Oxygen, Ubuntu, Roboto, Cantarell, 'Fira Sans', 'Droid Sans', 'Helvetica Neue', sans-serif;font-size:14px;font-style:normal;font-weight:400;letter-spacing:normal;text-indent:0px;text-transform:none;word-spacing:0px;white-space:normal;background-color:rgb(34,34,34);text-decoration-thickness:initial;text-decoration-style:initial;text-decoration-color:initial;display:inline;float:none;"> and </span>**<span style="margin:0px;padding:0px;border:0px;font:inherit;vertical-align:baseline;color:rgb(224,62,45);">enter</span>****

<span style="color:rgb(224,62,45);">**Ins0mniA**</span>